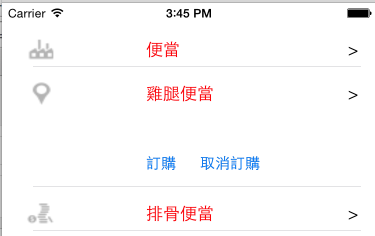
常常看到一些APP可以點擊TableCell時會動態展開看到更多的內容
製作方式如下
- 在Storyboard將cell的高度調整後,把要顯示的更多資料擺進去,此例子是多了兩顆按鈕

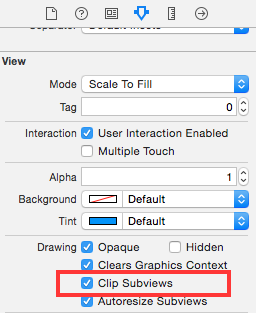
- [重要]記得要將tablecell的Clip Subviews打勾,這樣才能呈現擇疊的效果,如果沒打勾隱藏起來的按鈕都會跑出來並且蓋到其他cell上面

- 新增一個CellsValue Class ```swift
import Foundation
public class CellsValue{
var title:String!;//標題
var expand:Bool = false;//cell是否展開,預設為false
init(){}
}
1
2
3
4
5
6
7
8
9
10
11
12
13
14
15
16
17
18
19
20
21
22
23
24
25
26
27
28
29
30
31
32
33
34
35
36
37
38
39
40
41
42
43
44
45
46
47
48
49
50
51
52
53
54
55
56
57
58
|
*   將controller改寫如下
```swift
import UIKit
class ViewController: UIViewController , UITableViewDelegate , UITableViewDataSource{
   @IBOutlet weak var uitable: UITableView!
   var data : [CellsValue]!;
   override func viewDidLoad() {
      super.viewDidLoad()
      uitable.dataSource = self;
      uitable.delegate = self;
      data = [];
      var c = CellsValue();
      c.title = "便當";
      data.append(c);
      c = CellsValue();
      c.title = "雞腿便當";
      data.append(c);
      c = CellsValue();
      c.title = "排骨便當";
      data.append(c);
  }

      //這個table包含幾個section
  func numberOfSectionsInTableView(tableView: UITableView!) -> Int {
     return 1
  }
  //每個section有幾個row
  func tableView(tableView: UITableView, numberOfRowsInSection section: Int) -> Int {
     return data.count;
  }
  //每個row顯示的內容
  func tableView(tableView: UITableView, cellForRowAtIndexPath indexPath: NSIndexPath) -> UITableViewCell {
     let identifier = "Customer_Cell";
     var cell:CustomerCell? = uitable.dequeueReusableCellWithIdentifier(identifier) as? CustomerCell;
     if(cell == nil){
        cell = CustomerCell(style: UITableViewCellStyle.Default, reuseIdentifier: identifier);
     }
     //indexPath.row 可以知道目前是要製作第幾列的view
     cell?.lblTitle?.text = data[indexPath.row].title;
     //依據是第幾個row決定icon的圖片
     switch indexPath.row{
        case 0:
           cell?.imgIcon.image = UIImage(named: "icon-factory");
           break;
        case 1:
           cell?.imgIcon.image = UIImage(named: "icon-location");
           break;
        case 2:
           cell?.imgIcon.image = UIImage(named: "icon-money");
           break;
        default:
           break;
     }
        return cell!;
  }
}
|
override cell高度的事件heightForRowAtIndexPath ```swift
//每個cell的height
func tableView(tableView: UITableView, heightForRowAtIndexPath indexPath: NSIndexPath) -> CGFloat {
let cellValue = data[indexPath.row];
//如果cell是展開的話,回傳高度為120
if(cellValue.expand){
return 120;
}
else{
//否則回傳44
return 44;
}
}
1
2
3
4
5
6
7
8
9
10
11
12
13
14
|
*   override didSelectRowAtIndexPath事件 ```swift
//cell被選擇的狀況
func tableView(tableView: UITableView, didSelectRowAtIndexPath indexPath: NSIndexPath) {
   data[indexPath.row].expand = !data[indexPath.row].expand; //將目前狀態相反後存回去
   var cell = tableView.cellForRowAtIndexPath(indexPath) as? CustomerCell;
   if(cell != nil){
      //為了讓cell展開或閉合的效果能呈現,所以要呼叫reloadRowsAtIndexPaths讓cell重繪
      uitable.reloadRowsAtIndexPaths([indexPath], withRowAnimation: UITableViewRowAnimation.Automatic)
      //不要讓cell有選擇起來的反黑的效果,用這這個語法可以取消選擇
      uitable.deselectRowAtIndexPath(indexPath, animated: false);
   }
}
|
- 大功告成,點擊後會展開跟收合的Cell就完成了


