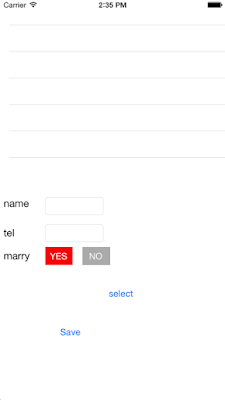
這邊做個簡單的介面,讓TableView的資料來自資料庫,並能把資料存到資料庫裡面
首先先把TableView的資料來源設定成來自資料庫,完整程式碼如下,這樣就已經把Table的datasource friends來源改成SQLite了 ```swift
import UIKit
import CoreData
class ViewController: UIViewController , UITableViewDelegate , UITableViewDataSource, NSFetchedResultsControllerDelegate{
@IBOutlet weak var tableview: UITableView!
var friends : [Friend] = []
var fetchRequestController:NSFetchedResultsController!
override func viewDidLoad() {super.viewDidLoad() //讀取Friend的Entity var fetchRequest = NSFetchRequest(entityName: "Friend") //排序方式用name這個欄位 let sortDescriptor = NSSortDescriptor(key: "name", ascending: true) fetchRequest.sortDescriptors = [sortDescriptor] if let managedObjectContext = (UIApplication.sharedApplication().delegate as AppDelegate).managedObjectContext{ fetchRequestController = NSFetchedResultsController(fetchRequest: fetchRequest, managedObjectContext: managedObjectContext, sectionNameKeyPath: nil, cacheName: nil) //delegate設定為自己時,當新增修改刪除SQLite的資料時會呼叫以下事件 //controllerWillChangeContent() //controller(_:didChangeObject:atIndexPath:forChangeType:newIndexPath:) //controllerDidChangeContent(_:) fetchRequestController.delegate = self var e:NSError? var result = fetchRequestController.performFetch(&e) friends = fetchRequestController.fetchedObjects as [Friend] if result != true{ println(e?.localizedDescription) } }}
  override func didReceiveMemoryWarning() {
  super.didReceiveMemoryWarning()
  // Dispose of any resources that can be recreated.
}
  func tableView(tableView: UITableView, cellForRowAtIndexPath indexPath: NSIndexPath) -> UITableViewCell {
  let identifier = "cell"
  var cell = tableView.dequeueReusableCellWithIdentifier(identifier) as customCell
  cell.nameLabel.text = friends[indexPath.row].name
  cell.telLabel.text = friends[indexPath.row].tel.stringValue
  cell.picImageView.image = UIImage(data: friends[indexPath.row].picture)
  cell.marryLabel.text = friends[indexPath.row].marry.boolValue ? "YES" : "NO"
  return cell
}
  func tableView(tableView: UITableView, numberOfRowsInSection section: Int) -> Int {
  return friends.count
}
}
1 |
|
實作載入圖片的按鈕,需要讓viewController實作UIImagePickerControllerDelegate和UINavigationControllerDelegate
1 | class ViewController: UIViewController , UITableViewDelegate , UITableViewDataSource, NSFetchedResultsControllerDelegate , UIImagePickerControllerDelegate,UINavigationControllerDelegate |
selectPicture的按鈕 ```swift
@IBAction func SelectPictureClick(sender: AnyObject) {
let imagePicker = UIImagePickerController()
imagePicker.allowsEditing = false
imagePicker.sourceType = UIImagePickerControllerSourceType.PhotoLibrary
imagePicker.delegate = self
//顯示挑選圖片的視窗
self.presentViewController(imagePicker, animated: true, completion: nil)
}
func imagePickerController(picker: UIImagePickerController, didFinishPickingMediaWithInfo info: [NSObject : AnyObject]) {
PicImageView.image = info[UIImagePickerControllerOriginalImage] as? UIImage
PicImageView.contentMode = UIViewContentMode.ScaleAspectFill
PicImageView.clipsToBounds = true
//關閉挑選圖片的視窗
dismissViewControllerAnimated(true, completion: nil)
}
1 | 接著執行看看應該結果[](http://1.bp.blogspot.com/-2NW3TefbDxE/VQK1HNE_8rI/AAAAAAAAEkw/l2v6Div6BYA/s1600/test.gif) |
接著執行看看會發現按了儲存按鈕後雖然存進資料庫了,但沒有讓TableView馬上連動顯示,必須重新開APP才會顯示在table上* 還記得之前有繼承NSFetchedResultsControllerDelegate嗎?這時候派上用場了,補上幾個事件讓他可以跟TableView連動吧 ```swift
//資料庫準備更新了
func controllerWillChangeContent(controller: NSFetchedResultsController) {
tableview.beginUpdates()
}
func controller(controller: NSFetchedResultsController, didChangeObject anObject: AnyObject, atIndexPath indexPath: NSIndexPath?, forChangeType type: NSFetchedResultsChangeType, newIndexPath: NSIndexPath?) {
switch type{
case .Insert:
tableview.insertRowsAtIndexPaths([newIndexPath!], withRowAnimation: UITableViewRowAnimation.Fade)
case .Delete:
tableview.deleteRowsAtIndexPaths([indexPath!], withRowAnimation: UITableViewRowAnimation.Fade)
case .Update:
tableview.reloadRowsAtIndexPaths([indexPath!], withRowAnimation: UITableViewRowAnimation.Fade)
default:
tableview.reloadData()
}
friends = controller.fetchedObjects as [Friend]
}
func controllerDidChangeContent(controller: NSFetchedResultsController) {
tableview.endUpdates()
}
1 | 接著再執行看看應該就可以看到他會馬上顯示了* 最後來個刪除吧!!這邊只舉例刪除該如何做,就不加到例子當中了 ```swift |
基本上有操作過.NET Entity物件的話,這邊的概念幾乎都雷同,最後補上完整的程式碼 ```swift
import UIKit
import CoreData
class ViewController: UIViewController , UITableViewDelegate , UITableViewDataSource, UINavigationControllerDelegate ,NSFetchedResultsControllerDelegate , UIImagePickerControllerDelegate{
@IBOutlet weak var tableview: UITableView!
var friends : [Friend] = []
var fetchRequestController:NSFetchedResultsController!
@IBOutlet weak var NameTextField: UITextField!
@IBOutlet weak var TelTextField: UITextField!
@IBOutlet weak var PicImageView: UIImageView!
@IBOutlet weak var YesButton: UIButton!
@IBOutlet weak var NoButton: UIButton!
override func viewDidLoad() {super.viewDidLoad() //讀取Friend的Entity var fetchRequest = NSFetchRequest(entityName: "Friend") //排序方式用name這個欄位 let sortDescriptor = NSSortDescriptor(key: "name", ascending: true) fetchRequest.sortDescriptors = [sortDescriptor] if let managedObjectContext = (UIApplication.sharedApplication().delegate as AppDelegate).managedObjectContext{ fetchRequestController = NSFetchedResultsController(fetchRequest: fetchRequest, managedObjectContext: managedObjectContext, sectionNameKeyPath: nil, cacheName: nil) //delegate設定為自己時,當新增修改刪除SQLite的資料時會呼叫以下事件 //controllerWillChangeContent() //controller(_:didChangeObject:atIndexPath:forChangeType:newIndexPath:) //controllerDidChangeContent(_:) fetchRequestController.delegate = self var e:NSError? var result = fetchRequestController.performFetch(&e) friends = fetchRequestController.fetchedObjects as [Friend] if result != true{ println(e?.localizedDescription) } }}
  override func didReceiveMemoryWarning() {
  super.didReceiveMemoryWarning()
  // Dispose of any resources that can be recreated.
}
  func tableView(tableView: UITableView, cellForRowAtIndexPath indexPath: NSIndexPath) -> UITableViewCell {
  let identifier = "cell"
  var cell = tableView.dequeueReusableCellWithIdentifier(identifier) as customCell
  cell.nameLabel.text = friends[indexPath.row].name
  cell.telLabel.text = friends[indexPath.row].tel.stringValue
  cell.picImageView.image = UIImage(data: friends[indexPath.row].picture)
  cell.marryLabel.text = friends[indexPath.row].marry.boolValue ? "YES" : "NO"
  return cell
}
  func tableView(tableView: UITableView, numberOfRowsInSection section: Int) -> Int {
  return friends.count
}
@IBAction func MarryButtonClick(sender: AnyObject) {YesButton.backgroundColor = (sender as UIButton == YesButton) ? UIColor.redColor() : UIColor.lightGrayColor() NoButton.backgroundColor = (sender as UIButton == NoButton) ? UIColor.redColor() : UIColor.lightGrayColor()}
@IBAction func SelectPictureClick(sender: AnyObject) {let imagePicker = UIImagePickerController() imagePicker.allowsEditing = false imagePicker.sourceType = UIImagePickerControllerSourceType.PhotoLibrary imagePicker.delegate = self //顯示挑選圖片的視窗 self.presentViewController(imagePicker, animated: true, completion: nil)}
func imagePickerController(picker: UIImagePickerController, didFinishPickingMediaWithInfo info: [NSObject : AnyObject]) {PicImageView.image = info[UIImagePickerControllerOriginalImage] as? UIImage PicImageView.contentMode = UIViewContentMode.ScaleAspectFill PicImageView.clipsToBounds = true //關閉挑選圖片的視窗 dismissViewControllerAnimated(true, completion: nil)}
@IBAction func SaveClick(sender: AnyObject) {if let manageObjectContext = (UIApplication.sharedApplication().delegate as AppDelegate).managedObjectContext{ var friend = NSEntityDescription.insertNewObjectForEntityForName("Friend", inManagedObjectContext: manageObjectContext) as Friend friend.name = NameTextField.text friend.tel = TelTextField.text.toInt() friend.marry = (YesButton.backgroundColor == UIColor.redColor()) ? true : false friend.picture = UIImagePNGRepresentation(PicImageView.image) var e:NSError? if manageObjectContext.save(&e) != true{ println("error: \(e?.localizedDescription)") return } }}
//資料庫準備更新了
func controllerWillChangeContent(controller: NSFetchedResultsController) {tableview.beginUpdates()}
func controller(controller: NSFetchedResultsController, didChangeObject anObject: AnyObject, atIndexPath indexPath: NSIndexPath?, forChangeType type: NSFetchedResultsChangeType, newIndexPath: NSIndexPath?) {switch type{ case .Insert: tableview.insertRowsAtIndexPaths([newIndexPath!], withRowAnimation: UITableViewRowAnimation.Fade) case .Delete: tableview.deleteRowsAtIndexPaths([indexPath!], withRowAnimation: UITableViewRowAnimation.Fade) case .Update: tableview.reloadRowsAtIndexPaths([indexPath!], withRowAnimation: UITableViewRowAnimation.Fade) default: tableview.reloadData() } friends = controller.fetchedObjects as [Friend]}
func controllerDidChangeContent(controller: NSFetchedResultsController) {tableview.endUpdates()}
}