承上一篇的Code我們繼續往下延伸,如何在地圖釘上大頭針呢?
首先我們把mapkit view的user location選項關閉,改成自己放上去的大頭針試試看
把程式修改如下,這邊主要著重在addPointAnnotation這個function ```swift
import UIKit
import CoreLocation
import MapKit
class MapViewController: UIViewController,CLLocationManagerDelegate {@IBOutlet weak var uimap: MKMapView!//地圖元件var location : CLLocationManager!; //座標管理元件
override func viewDidLoad() {super.viewDidLoad(); location = CLLocationManager(); location.delegate = self; //詢問使用者是否同意給APP定位功能 location.requestWhenInUseAuthorization(); //開始接收目前位置資訊 location.startUpdatingLocation(); location.distanceFilter = CLLocationDistance(10); //表示移動10公尺再更新座標資訊}
  override func viewDidDisappear(animated: Bool) {
  //因為GPS功能很耗電,所以被敬執行時關閉定位功能
  location.stopUpdatingLocation();
}
func locationManager(manager: CLLocationManager!, didUpdateLocations locations: [AnyObject]!) {//取得目前的座標位置 let c = locations[0] as CLLocation; let nowLocation = CLLocationCoordinate2D(latitude: c.coordinate.latitude, longitude: c.coordinate.longitude); //將map中心點定在目前所在的位置 //span是地圖zoom in, zoom out的級距 let _span:MKCoordinateSpan = MKCoordinateSpan(latitudeDelta: 0.0005, longitudeDelta: 0.0005); self.uimap.setRegion(MKCoordinateRegion(center: nowLocation, span: _span), animated: true); //加入座標 addPointAnnotation(c.coordinate.latitude, longitude: c.coordinate.longitude);}
//新增座標
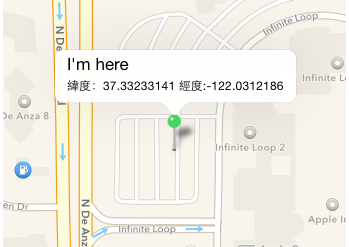
private func addPointAnnotation(latitude:CLLocationDegrees , longitude:CLLocationDegrees){//大頭針 var point:MKPointAnnotation = MKPointAnnotation(); //設定大頭針的座標位置 point.coordinate = CLLocationCoordinate2D(latitude: latitude, longitude: longitude); point.title = "I'm here"; point.subtitle = "緯度:\(latitude) 經度:\(longitude)"; uimap.addAnnotation(point);}
}
1 | 執行看看成果,點擊大頭貼可以看到剛剛設定的title與subtitle |
- 接著override mapview的viewForAnnotation事件 ```swift
func mapView(mapView: MKMapView!, viewForAnnotation annotation: MKAnnotation!) -> MKAnnotationView! {
var pointView : MKPinAnnotationView? = mapView.dequeueReusableAnnotationViewWithIdentifier(“CustomerPoint”) as?MKPinAnnotationView;
if(pointView == nil){
}pointView = MKPinAnnotationView(annotation: annotation, reuseIdentifier: "CustomerPoint"); //因為已經改寫了Annotation View,所以要將canShowCallout改成true,否則點擊大頭針不會跑出來我們剛剛指定的title跟subtitle pointView?.canShowCallout = true;
pointView!.pinColor = MKPinAnnotationColor.Green;
return pointView;
}
```
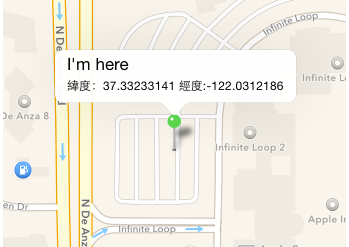
- 結果如下
- 這邊應該看出來整個Annotation的顯示方式都可以透過viewForAnnotation這個事件來改寫,所以下一篇就來介紹如何客製化Annotation的View