繼續接續上一篇,我們來把大頭針改成自己想要的樣子吧,已這張圖為例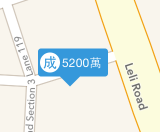
從上面那張圖可以看出來需要畫一個長方形,長方形裡面有一個title與圓形Icon,還需要一個倒三角形把它組回去,所以先來把這些元素準備一下吧
首先先建立一個Class繼承MKAnnotationView ```swift
import Foundation
import MapKit
public class MyAnnotation : MKAnnotationView {
var rectangoView:UIView!; //長方形
var lblTitle:UILabel!;//Title
var lblIcon:UILabel!;//圓形icon
var circleView:UIView!; //原型view
var triangle:UIView!; //三角形
public override init(annotation: MKAnnotation!, reuseIdentifier: String!) {super.init(annotation: annotation, reuseIdentifier: reuseIdentifier);}
  public required init(coder aDecoder: NSCoder) {
  super.init(coder: aDecoder);
}
}
1 |
|
- 接著在MyAnnotation寫一個function來詳細畫這個View的內容 ```swift
public func DrawCustomerView() {
}//Title lblTitle.text = "5200萬"; lblTitle.textColor = UIColor.whiteColor(); lblTitle.font = UIFont.systemFontOfSize(12); lblTitle.sizeToFit(); //大大的長方形 rectangoView.frame = CGRect(x: 0, y: 0, width: lblTitle.frame.width + 30, height: 28);//整體 rectangoView.backgroundColor = UIColor(red: 0.208, green:0.596 , blue: 0.859, alpha: 1); rectangoView.layer.cornerRadius = 3;//設定圓角 //“icon”圓型小字 lblIcon.font = UIFont.systemFontOfSize(11); lblIcon.font = UIFont.boldSystemFontOfSize(14); lblIcon.text = "成"; lblIcon.textColor = rectangoView.backgroundColor; lblIcon.sizeToFit(); lblIcon.center = CGPoint (x: 10, y: 10); //圓形 circleView.frame = CGRect(x: 2, y: 4, width: 20, height: 20);//圓形標籤 circleView.backgroundColor = UIColor.whiteColor(); circleView.layer.cornerRadius = 10; circleView.alpha = 1; //畫三角形 triangle.backgroundColor = UIColor(red: 0.208, green:0.596 , blue: 0.859, alpha: 1); //rectangoView.Transform 旋轉 DrawView.frame = CGRect(x: 0, y: 0, width:triangle.frame.width,height: 48);
1 |
|
- 立馬執行看看,你會發現發生錯誤在MyAnnotation class,而且錯誤訊息寫得不清不楚的,這是第一個地雷,雖然繼承MKAnnotationView沒有要求一定要實作init(frame: CGRect),但不做會壞掉喔,那到底幹麻不列為required阿!!!所以乖乖補上到MyAnnotation就正常摟 ```swift
override init(frame: CGRect) {
}super.init(frame: frame);
1 |
|
- 接下來我們測試一下這個畫出來的點是否跟插大頭針指的位置相同,結果…..歪掉了
- 但我們可以看出來他是在針頭的地方開始畫,所以來做點加工吧,在DrawCustomerView()最後面加上下面的code讓整個View位移來符合需求 ```swift
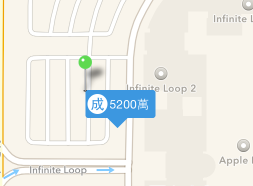
self.frame = CGRect(x: 0, y: 0, width: rectangoView.frame.width, height: rectangoView.frame.height);self.centerOffset = CGPoint(x: 0, y: -21);

1 | 我們再看看... |
MyAnnotation Class完整如下
1 | import Foundation |