開始之前想推薦這本書:養成iOS8 App程式設計實力的25堂課:最新Swift開發教學,只能說看了對於初學者的我來說受益良多,而且對於IOS很多觀念也更加清楚了
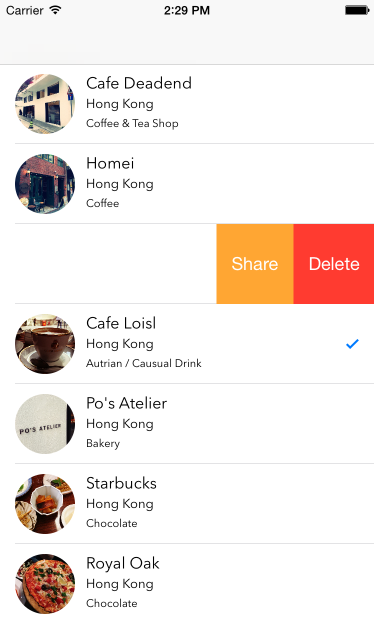
- 這邊要實作的功能如下圖

- IOS8的TableView當中,有個可以往左滑可以選擇更多動作的功能,Apple官方有提供相對應的事件可以實作它
- 首先先Override TableView commitEditingStyle這個事件,什麼都先不要做就執行看看 ```swift
func tableView(tableView: UITableView, commitEditingStyle editingStyle: UITableViewCellEditingStyle, forRowAtIndexPath indexPath: NSIndexPath) {
}
1
2
3
4
5
6
7
8
9
10
11
12
| 立馬預設的Delete按鈕就跑出來了
[](http://1.bp.blogspot.com/-maAldiH9hOE/VP6RASa2iQI/AAAAAAAAEiE/3px4PGz4sWU/s1600/%E8%9E%A2%E5%B9%95%E5%BF%AB%E7%85%A7%2B2015-03-10%2B%E4%B8%8B%E5%8D%882.36.30.png)
* 接著補上以下code,再實際執行看看就可以發現該列可以刪除了 ```swift
func tableView(tableView: UITableView, commitEditingStyle editingStyle: UITableViewCellEditingStyle, forRowAtIndexPath indexPath: NSIndexPath) {
if editingStyle == UITableViewCellEditingStyle.Delete{
//將TableView的DataSource刪除
self.restaurantArray.removeAtIndex(indexPath.row)
//將TableView該列刪除
tableView.deleteRowsAtIndexPaths([indexPath], withRowAnimation: UITableViewRowAnimation.Fade)
}
}
|
但如果要客製更多按鈕呢?接下來改寫 editActionsForRowAtIndexPath這個事件,但需要特別注意的是如果我們新增了editActionsForRowAtIndexPath這個事件,則IOS就不會預設幫我們增加Delete的按鈕,所以Delete的按鈕也得自己做瞜~
先把commitEditingStyle恢復成空值,只讓IOS知道我們要左滑出現功能列就好 ```swift
func tableView(tableView: UITableView, commitEditingStyle editingStyle: UITableViewCellEditingStyle, forRowAtIndexPath indexPath: NSIndexPath) {
//把剛剛寫的都刪光光
}
1
2
3
4
5
6
7
8
9
10
11
12
| 接著改寫editActionsForRowAtIndexPath ```swift
func tableView(tableView: UITableView, editActionsForRowAtIndexPath indexPath: NSIndexPath) -> [AnyObject]? {
var shareAction = UITableViewRowAction(style: UITableViewRowActionStyle.Default, title: "Share", handler: nil)
//delete按鈕自己做 var deleteAction = UITableViewRowAction(style: UITableViewRowActionStyle.Default, title: "Delete", handler: {
(action:UITableViewRowAction! , indexPath:NSIndexPath!) -> Void in
self.restaurantArray.removeAtIndex(indexPath.row)
self.restaurantTable.deleteRowsAtIndexPaths([indexPath], withRowAnimation: UITableViewRowAnimation.Fade)
})
return [deleteAction,shareAction]
}
|
執行看看就可以看到多出了一過按鈕了,如果想改變按鈕的顏色可以這樣寫 ```swift
shareAction.backgroundColor = UIColor(red: 255/255, green: 166/255, blue: 51/255, alpha: 1)
```