0%

開發Android時,如何用Post的方式 Call API來取得值

  • 首先 ```csharp
    String UrlLocation = 你的API位置; //API位置

          String PostData = 要傳遞的資料(字串); //EX: ID=Toyo&Name=Steven
    
              HttpURLConnection conn = null;
          StringBuilder sb = new StringBuilder();
          try
          {
              URL Url = new URL(UrlLocation);
              conn = (HttpURLConnection)Url.openConnection();
              conn.setRequestMethod("POST"); //要呼意的方式 Get Or Post
              conn.setDoInput(true);
              conn.setDoOutput(true);
              conn.connect();
              //開始傳輸資料過去給API
              OutputStream Output = conn.getOutputStream();
              BufferedWriter writer = new BufferedWriter(
                      new OutputStreamWriter(Output, "UTF-8"));
              writer.write(PostData);
              writer.flush();
              writer.close();
              Output.close();
              //讀取API回傳的值
              BufferedReader br = new BufferedReader(new InputStreamReader(
                      conn.getInputStream(),"utf-8"));
      
                  String line;
              while ((line=br.readLine())!=null)
              {
                  sb.append(line);
              }
          }
          catch(Exception ex)
          {
              Log.e("API_Post",ex.getMessage());
          }
          finally
          {
              if (conn != null)
                  conn.disconnect();
          }
      
              return sb.toString();
    
1
2
3
4
5
6
7
8
9
10
11
12
13
14
15
16
17
18
19
20
21
22
23
24
25
26
27
28
29
30
31
32
33
34
35
36
37
38
39
40
41
42
43
44
45
46
47
48
49
50
51
52
53
54
55
56
57
58
59
60
61
62
63
64
65
66
67
68
69

* 目前測試的結果是,如果不把呼叫API用執行緒AsyncTask的方式處理,在conn.connect()這邊會跳出Http...InMainThread的Exception,原因是Andorid預設呼叫外部處理5秒沒有回應就會跳Exception,所以預設不管這支API反應速度快不快,他都要你把上面那段做成切執行緒的方式處理,當然網路上還是有舊的方式可以用,但既然這是官方目前推薦的做法就照做吧 ```csharp
//這邊有三個參數
//第一個參數String : 呼叫這個方法時要帶入的參數型態,這邊就是可以帶入String,
//第二個參數Void : 處理時會回報狀態跟進度,這邊寫Void表示不回傳目前處理狀態
//第三個參數String : 處理完成時回傳的值
private class Post extends AsyncTask<String,Void,String>
{

//事件處理順序onPreExecute , doInBackground ,onPostExecute
@Override
protected void onPreExecute() {
super.onPreExecute();
}

@Override
protected String doInBackground(String ... params) {
//改寫這邊,呼叫方法時可以傳進多個String,所以這邊改抓params
String UrlLocation = params[0]; //API位置
String PostData = params[1]; //要傳資料

HttpURLConnection conn = null;
StringBuilder sb = new StringBuilder();
try
{
URL Url = new URL(UrlLocation);
conn = (HttpURLConnection)Url.openConnection();
conn.setRequestMethod("POST"); //要呼意的方式 Get Or Post
conn.setDoInput(true);
conn.setDoOutput(true);
conn.connect();
//開始傳輸資料過去給API
OutputStream Output = conn.getOutputStream();
BufferedWriter writer = new BufferedWriter(
new OutputStreamWriter(Output, "UTF-8"));
writer.write(PostData);
writer.flush();
writer.close();
Output.close();

//讀取API回傳的值
BufferedReader br = new BufferedReader(new InputStreamReader(
conn.getInputStream(),"utf-8"));

String line;
while ((line=br.readLine())!=null)
{
sb.append(line);
}
}
catch(Exception ex)
{
Log.e("API_Post",ex.getMessage());
}
finally
{
if (conn != null)
conn.disconnect();
}

return sb.toString();
}

@Override
protected void onPostExecute(String Result) {
super.onPostExecute(Result);
}
}

  • 最後,因為在Debug模式AsyncTask並不會進入,所以要在doInBackground的事件裡面加上這行,但因為非Debug模式下這行會造成Android沒有回應, 所以記得在部署時把這行拿掉!! ```csharp
    android.os.Debug.waitForDebugger();
1
2
3
4
5
6

* 全部完成後,呼叫方式如下 ```csharp
String Url = "http://www.api.com.tw";
String PostData = "id=toyo&name=steven";
String Response = new Post().execute(Url,PostData).get();

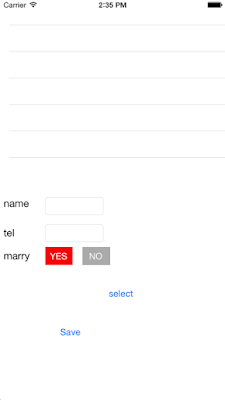
這邊做個簡單的介面,讓TableView的資料來自資料庫,並能把資料存到資料庫裡面

  • 首先先把TableView的資料來源設定成來自資料庫,完整程式碼如下,這樣就已經把Table的datasource friends來源改成SQLite了 ```swift
    import UIKit
    import CoreData
    class ViewController: UIViewController , UITableViewDelegate , UITableViewDataSource, NSFetchedResultsControllerDelegate{
    @IBOutlet weak var tableview: UITableView!
    var friends : [Friend] = []
    var fetchRequestController:NSFetchedResultsController!
    override func viewDidLoad() {

      super.viewDidLoad()
      //讀取Friend的Entity
      var fetchRequest = NSFetchRequest(entityName: "Friend")
      //排序方式用name這個欄位
      let sortDescriptor = NSSortDescriptor(key: "name", ascending: true)
      fetchRequest.sortDescriptors = [sortDescriptor]
      if let managedObjectContext = (UIApplication.sharedApplication().delegate as AppDelegate).managedObjectContext{
          fetchRequestController = NSFetchedResultsController(fetchRequest: fetchRequest, managedObjectContext: managedObjectContext, sectionNameKeyPath: nil, cacheName: nil)
          //delegate設定為自己時,當新增修改刪除SQLite的資料時會呼叫以下事件
          //controllerWillChangeContent()
          //controller(_:didChangeObject:atIndexPath:forChangeType:newIndexPath:)
          //controllerDidChangeContent(_:)
          fetchRequestController.delegate = self
          var e:NSError?
          var result = fetchRequestController.performFetch(&e)
          friends = fetchRequestController.fetchedObjects as [Friend]
          if result != true{
               println(e?.localizedDescription)
          }
      }
    

    }

      override func didReceiveMemoryWarning() {
      super.didReceiveMemoryWarning()
      // Dispose of any resources that can be recreated.
    

    }

      func tableView(tableView: UITableView, cellForRowAtIndexPath indexPath: NSIndexPath) -> UITableViewCell {
      let identifier = "cell"
      var cell = tableView.dequeueReusableCellWithIdentifier(identifier) as customCell
      cell.nameLabel.text = friends[indexPath.row].name
      cell.telLabel.text = friends[indexPath.row].tel.stringValue
      cell.picImageView.image = UIImage(data: friends[indexPath.row].picture)
      cell.marryLabel.text = friends[indexPath.row].marry.boolValue ? "YES" : "NO"
      return cell
    

    }

      func tableView(tableView: UITableView, numberOfRowsInSection section: Int) -> Int {
      return friends.count
    

    }
    }

1
2
3
4
5
6
7
8
9
10
11
12

* 接著寫按下save後的事件將檔案能寫到資料庫中,在這之前先處理Yes and no的按鈕和載入圖片按鈕
Yes and No按鈕 ```swift
@IBOutlet weak var YesButton: UIButton!
@IBOutlet weak var NoButton: UIButton!

@IBAction func MarryButtonClick(sender: AnyObject) {
YesButton.backgroundColor = (sender as UIButton == YesButton) ? UIColor.redColor() : UIColor.lightGrayColor()
NoButton.backgroundColor = (sender as UIButton == NoButton) ? UIColor.redColor() : UIColor.lightGrayColor()
}


實作載入圖片的按鈕,需要讓viewController實作UIImagePickerControllerDelegate和UINavigationControllerDelegate

1
2
3
4
5
class ViewController: UIViewController , UITableViewDelegate , UITableViewDataSource, NSFetchedResultsControllerDelegate , UIImagePickerControllerDelegate,UINavigationControllerDelegate
{

}

selectPicture的按鈕 ```swift
@IBAction func SelectPictureClick(sender: AnyObject) {
let imagePicker = UIImagePickerController()
imagePicker.allowsEditing = false
imagePicker.sourceType = UIImagePickerControllerSourceType.PhotoLibrary
imagePicker.delegate = self
//顯示挑選圖片的視窗
self.presentViewController(imagePicker, animated: true, completion: nil)
}
func imagePickerController(picker: UIImagePickerController, didFinishPickingMediaWithInfo info: [NSObject : AnyObject]) {
PicImageView.image = info[UIImagePickerControllerOriginalImage] as? UIImage
PicImageView.contentMode = UIViewContentMode.ScaleAspectFill
PicImageView.clipsToBounds = true
//關閉挑選圖片的視窗
dismissViewControllerAnimated(true, completion: nil)
}

1
2
3
4
5
6
7
8
9
10
11
12
13
14
15
16
17
接著執行看看應該結果[![](http://1.bp.blogspot.com/-2NW3TefbDxE/VQK1HNE_8rI/AAAAAAAAEkw/l2v6Div6BYA/s400/test.gif)](http://1.bp.blogspot.com/-2NW3TefbDxE/VQK1HNE_8rI/AAAAAAAAEkw/l2v6Div6BYA/s1600/test.gif)
* 接著把Save按鈕按下後存到SQLite的事件寫好 ```swift
@IBAction func SaveClick(sender: AnyObject) {
if let manageObjectContext = (UIApplication.sharedApplication().delegate as AppDelegate).managedObjectContext{
var friend = NSEntityDescription.insertNewObjectForEntityForName("Friend", inManagedObjectContext: manageObjectContext) as Friend
friend.name = NameTextField.text
friend.tel = TelTextField.text.toInt()
friend.marry = (YesButton.backgroundColor == UIColor.redColor()) ? true : false
friend.picture = UIImagePNGRepresentation(PicImageView.image)
var e:NSError?
if manageObjectContext.save(&e) != true{
println("error: \(e?.localizedDescription)")
return
}
}
}

接著執行看看會發現按了儲存按鈕後雖然存進資料庫了,但沒有讓TableView馬上連動顯示,必須重新開APP才會顯示在table上* 還記得之前有繼承NSFetchedResultsControllerDelegate嗎?這時候派上用場了,補上幾個事件讓他可以跟TableView連動吧 ```swift
//資料庫準備更新了
func controllerWillChangeContent(controller: NSFetchedResultsController) {
tableview.beginUpdates()
}
func controller(controller: NSFetchedResultsController, didChangeObject anObject: AnyObject, atIndexPath indexPath: NSIndexPath?, forChangeType type: NSFetchedResultsChangeType, newIndexPath: NSIndexPath?) {
switch type{
case .Insert:
tableview.insertRowsAtIndexPaths([newIndexPath!], withRowAnimation: UITableViewRowAnimation.Fade)
case .Delete:
tableview.deleteRowsAtIndexPaths([indexPath!], withRowAnimation: UITableViewRowAnimation.Fade)
case .Update:
tableview.reloadRowsAtIndexPaths([indexPath!], withRowAnimation: UITableViewRowAnimation.Fade)
default:
tableview.reloadData()
}
friends = controller.fetchedObjects as [Friend]
}
func controllerDidChangeContent(controller: NSFetchedResultsController) {
tableview.endUpdates()
}

1
2
3
4
5
6
7
8
9
10
11
12
13
14
接著再執行看看應該就可以看到他會馬上顯示了*   最後來個刪除吧!!這邊只舉例刪除該如何做,就不加到例子當中了 ```swift
if let manageObjectContext = (UIApplication.sharedApplication().delegate as AppDelegate).managedObjectContext{
//簡單說就是挑出那個想刪除的物件
var friendToDelete = self.fetchRequestController.objectAtIndexPath(NSIndexPath(index: 0)) as Friend
//呼叫刪除方法把它丟進去
manageObjectContext.deleteObject(friendToDelete)
var e:NSError?
//儲存
if manageObjectContext.save(&e) != true{
println("error: \(e?.localizedDescription)")
}
}


  • 基本上有操作過.NET Entity物件的話,這邊的概念幾乎都雷同,最後補上完整的程式碼 ```swift
    import UIKit
    import CoreData
    class ViewController: UIViewController , UITableViewDelegate , UITableViewDataSource, UINavigationControllerDelegate ,NSFetchedResultsControllerDelegate , UIImagePickerControllerDelegate{
    @IBOutlet weak var tableview: UITableView!
    var friends : [Friend] = []
    var fetchRequestController:NSFetchedResultsController!
    @IBOutlet weak var NameTextField: UITextField!
    @IBOutlet weak var TelTextField: UITextField!
    @IBOutlet weak var PicImageView: UIImageView!
    @IBOutlet weak var YesButton: UIButton!
    @IBOutlet weak var NoButton: UIButton!
    override func viewDidLoad() {

      super.viewDidLoad()
      //讀取Friend的Entity
      var fetchRequest = NSFetchRequest(entityName: "Friend")
      //排序方式用name這個欄位
      let sortDescriptor = NSSortDescriptor(key: "name", ascending: true)
      fetchRequest.sortDescriptors = [sortDescriptor]
      if let managedObjectContext = (UIApplication.sharedApplication().delegate as AppDelegate).managedObjectContext{
          fetchRequestController = NSFetchedResultsController(fetchRequest: fetchRequest, managedObjectContext: managedObjectContext, sectionNameKeyPath: nil, cacheName: nil)
          //delegate設定為自己時,當新增修改刪除SQLite的資料時會呼叫以下事件
          //controllerWillChangeContent()
          //controller(_:didChangeObject:atIndexPath:forChangeType:newIndexPath:)
          //controllerDidChangeContent(_:)
          fetchRequestController.delegate = self
          var e:NSError?
          var result = fetchRequestController.performFetch(&e)
          friends = fetchRequestController.fetchedObjects as [Friend]
          if result != true{
               println(e?.localizedDescription)
          }
      }
    

    }

      override func didReceiveMemoryWarning() {
      super.didReceiveMemoryWarning()
      // Dispose of any resources that can be recreated.
    

    }

      func tableView(tableView: UITableView, cellForRowAtIndexPath indexPath: NSIndexPath) -> UITableViewCell {
      let identifier = "cell"
      var cell = tableView.dequeueReusableCellWithIdentifier(identifier) as customCell
      cell.nameLabel.text = friends[indexPath.row].name
      cell.telLabel.text = friends[indexPath.row].tel.stringValue
      cell.picImageView.image = UIImage(data: friends[indexPath.row].picture)
      cell.marryLabel.text = friends[indexPath.row].marry.boolValue ? "YES" : "NO"
      return cell
    

    }

      func tableView(tableView: UITableView, numberOfRowsInSection section: Int) -> Int {
      return friends.count
    

    }
    @IBAction func MarryButtonClick(sender: AnyObject) {

      YesButton.backgroundColor = (sender as UIButton == YesButton) ? UIColor.redColor() : UIColor.lightGrayColor()
      NoButton.backgroundColor = (sender as UIButton == NoButton) ? UIColor.redColor() : UIColor.lightGrayColor()
    

    }
    @IBAction func SelectPictureClick(sender: AnyObject) {

      let imagePicker = UIImagePickerController()
      imagePicker.allowsEditing = false
      imagePicker.sourceType = UIImagePickerControllerSourceType.PhotoLibrary
      imagePicker.delegate = self
      //顯示挑選圖片的視窗
      self.presentViewController(imagePicker, animated: true, completion: nil)
    

    }
    func imagePickerController(picker: UIImagePickerController, didFinishPickingMediaWithInfo info: [NSObject : AnyObject]) {

      PicImageView.image = info[UIImagePickerControllerOriginalImage] as? UIImage
      PicImageView.contentMode = UIViewContentMode.ScaleAspectFill
      PicImageView.clipsToBounds = true
      //關閉挑選圖片的視窗
      dismissViewControllerAnimated(true, completion: nil)
    

    }
    @IBAction func SaveClick(sender: AnyObject) {

      if let manageObjectContext = (UIApplication.sharedApplication().delegate as AppDelegate).managedObjectContext{
          var friend = NSEntityDescription.insertNewObjectForEntityForName("Friend", inManagedObjectContext: manageObjectContext) as Friend
          friend.name = NameTextField.text
          friend.tel = TelTextField.text.toInt()
          friend.marry = (YesButton.backgroundColor == UIColor.redColor()) ? true : false
          friend.picture = UIImagePNGRepresentation(PicImageView.image)
          var e:NSError?
          if manageObjectContext.save(&e) != true{
              println("error: \(e?.localizedDescription)")
              return
          }
      }
    

    }
    //資料庫準備更新了
    func controllerWillChangeContent(controller: NSFetchedResultsController) {

      tableview.beginUpdates()
    

    }
    func controller(controller: NSFetchedResultsController, didChangeObject anObject: AnyObject, atIndexPath indexPath: NSIndexPath?, forChangeType type: NSFetchedResultsChangeType, newIndexPath: NSIndexPath?) {

      switch type{
      case .Insert:
          tableview.insertRowsAtIndexPaths([newIndexPath!], withRowAnimation: UITableViewRowAnimation.Fade)
      case .Delete:
          tableview.deleteRowsAtIndexPaths([indexPath!], withRowAnimation: UITableViewRowAnimation.Fade)
      case .Update:
          tableview.reloadRowsAtIndexPaths([indexPath!], withRowAnimation: UITableViewRowAnimation.Fade)
      default:
          tableview.reloadData()
      }
      friends = controller.fetchedObjects as [Friend]
    

    }
    func controllerDidChangeContent(controller: NSFetchedResultsController) {

      tableview.endUpdates()
    

    }
    }

CoreData是是一種以物件導向方式讓開發者與跟資料庫互動的框架,好處是你不需要懂SQL也能對SQLite做操作

[![](https://1.bp.blogspot.com/-cLEXYUQDTJA/VQJMODzIHuI/AAAAAAAAEjg/uDb2WQBOTmA/s1600/S__23961604.jpg)](http://1.bp.blogspot.com/-cLEXYUQDTJA/VQJMODzIHuI/AAAAAAAAEjg/uDb2WQBOTmA/s1600/S__23961604.jpg)[ ](http://1.bp.blogspot.com/-cLEXYUQDTJA/VQJMODzIHuI/AAAAAAAAEjg/uDb2WQBOTmA/s1600/S__23961604.jpg)
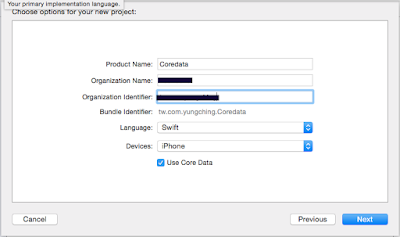
  • 接著來筆記如何實作CoreData,首先先建立一個專案並把Use Core Data勾選起來

  • 接著打開AppDelegate最下面可以看到多了一大堆程式碼 ```js
    // MARK: - Core Data stack

      lazy var applicationDocumentsDirectory: NSURL = {
      // The directory the application uses to store the Core Data store file. This code uses a directory named "tw.com.xxx.Coredata" in the application's documents Application Support directory.
      let urls = NSFileManager.defaultManager().URLsForDirectory(.DocumentDirectory, inDomains: .UserDomainMask)
      return urls[urls.count-1] as NSURL
    

    }()

      lazy var managedObjectModel: NSManagedObjectModel = {
      // The managed object model for the application. This property is not optional. It is a fatal error for the application not to be able to find and load its model.
      let modelURL = NSBundle.mainBundle().URLForResource("Coredata", withExtension: "momd")!
      return NSManagedObjectModel(contentsOfURL: modelURL)!
    

    }()

      lazy var persistentStoreCoordinator: NSPersistentStoreCoordinator? = {
      // The persistent store coordinator for the application. This implementation creates and return a coordinator, having added the store for the application to it. This property is optional since there are legitimate error conditions that could cause the creation of the store to fail.
      // Create the coordinator and store
      var coordinator: NSPersistentStoreCoordinator? = NSPersistentStoreCoordinator(managedObjectModel: self.managedObjectModel)
      let url = self.applicationDocumentsDirectory.URLByAppendingPathComponent("Coredata.sqlite")
      var error: NSError? = nil
      var failureReason = "There was an error creating or loading the application's saved data."
      if coordinator!.addPersistentStoreWithType(NSSQLiteStoreType, configuration: nil, URL: url, options: nil, error: &error) == nil {
          coordinator = nil
          // Report any error we got.
          let dict = NSMutableDictionary()
          dict[NSLocalizedDescriptionKey] = "Failed to initialize the application's saved data"
          dict[NSLocalizedFailureReasonErrorKey] = failureReason
          dict[NSUnderlyingErrorKey] = error
          error = NSError(domain: "YOUR_ERROR_DOMAIN", code: 9999, userInfo: dict)
          // Replace this with code to handle the error appropriately.
          // abort() causes the application to generate a crash log and terminate. You should not use this function in a shipping application, although it may be useful during development.
          NSLog("Unresolved error \(error), \(error!.userInfo)")
          abort()
      }
      return coordinator
    

    }()

      lazy var managedObjectContext: NSManagedObjectContext? = {
      // Returns the managed object context for the application (which is already bound to the persistent store coordinator for the application.) This property is optional since there are legitimate error conditions that could cause the creation of the context to fail.
      let coordinator = self.persistentStoreCoordinator
      if coordinator == nil {
          return nil
      }
      var managedObjectContext = NSManagedObjectContext()
      managedObjectContext.persistentStoreCoordinator = coordinator
      return managedObjectContext
    

    }()

      // MARK: - Core Data Saving support
    
      func saveContext () {
      if let moc = self.managedObjectContext {
          var error: NSError? = nil
          if moc.hasChanges && !moc.save(&error) {
              // Replace this implementation with code to handle the error appropriately.
              // abort() causes the application to generate a crash log and terminate. You should not use this function in a shipping application, although it may be useful during development.
              NSLog("Unresolved error \(error), \(error!.userInfo)")
              abort()
          }
      }
    

    }

1
2
3
4
5
6
7
8
9
10
11
12
13
14
15
16

* 接著建立物件託管模型
[![](https://1.bp.blogspot.com/-KK3Tu_Vazbk/VQJTyV8AxfI/AAAAAAAAEj8/YqCpExRBFF0/s400/%E8%9E%A2%E5%B9%95%E5%BF%AB%E7%85%A7%2B2015-03-13%2B%E4%B8%8A%E5%8D%8811.02.54.png)](http://1.bp.blogspot.com/-KK3Tu_Vazbk/VQJTyV8AxfI/AAAAAAAAEj8/YqCpExRBFF0/s1600/%E8%9E%A2%E5%B9%95%E5%BF%AB%E7%85%A7%2B2015-03-13%2B%E4%B8%8A%E5%8D%8811.02.54.png)
* 接著建立Entities
[![](https://1.bp.blogspot.com/-D2JtYHHTBxI/VQJUguKuVhI/AAAAAAAAEkE/2vxmi1ktG4U/s400/%E8%9E%A2%E5%B9%95%E5%BF%AB%E7%85%A7%2B2015-03-13%2B%E4%B8%8A%E5%8D%8811.07.18.png)](http://1.bp.blogspot.com/-D2JtYHHTBxI/VQJUguKuVhI/AAAAAAAAEkE/2vxmi1ktG4U/s1600/%E8%9E%A2%E5%B9%95%E5%BF%AB%E7%85%A7%2B2015-03-13%2B%E4%B8%8A%E5%8D%8811.07.18.png)
***<span style="color: blue;">圖片需要用Binary Data來儲存 </span>**
* 接著建立Class來對應Entity ```js
import Foundation
import CoreData
class Friend:NSManagedObject {
@NSManaged var name:String!
@NSManaged var tel:NSNumber!
@NSManaged var picture:NSData!
@NSManaged var marry:NSNumber!
}

*對應Entity中的Boolean, Integer, Float and Double attributes,都是用NSNumber

  • 接著設定Entity與Class的對應關係,如圖:

    這樣託管物件的建立就已經完成了,下一篇介紹如何叫用

IOS提供CLGeocoder將地址轉成經緯度,或是把經緯度轉換成地址,詳細語法如下

  • 記得先Import MapKit
  • 地址轉經緯度(geocodeAddressString) ```swift
    let geoCoder = CLGeocoder()
    geoCoder.geocodeAddressString(“這邊帶入地址”, completionHandler: {
    (placemarks:[AnyObject]!,error:NSError!) -> Void in
    if error != nil{
    println(error)
    return
    
    }
    if placemarks != nil && placemarks.count > 0{
    let placemark = placemarks[0] as CLPlacemark
    //placemark.location.coordinate 取得經緯度的參數   }
    
    })
1
2
3
4
5
6
7
8
9
10
11
12
13
14
15
16
17
18
19
20
21
22
23
24
25

* 經緯度轉地址的方法 ```swift
let geoCoder = CLGeocoder()
geoCoder.reverseGeocodeLocation(CLLocation(latitude: 25.024839 , longitude: 121.549170), completionHandler: {
(placemarks:[AnyObject]!,error:NSError!) -> Void in
if error != nil{
println(error)
return
}

//name 街道地址
//country 國家
//province 省
//locality 市
//sublocality 縣.區
//route 街道、路
//streetNumber 門牌號碼
//postalCode 郵遞區號
if placemarks != nil && placemarks.count > 0{
let placemark = placemarks[0] as CLPlacemark
//這邊拼湊轉回來的地址
//placemark.name
}
})

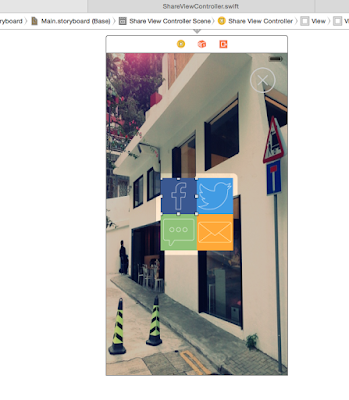
目標結果如圖

  • 首先先把最後所有按鈕要放的位置擺好
  • 把每個按鈕跟ViewController做對應 ```swift
    @IBOutlet weak var backgroundImageView: UIImageView!
    @IBOutlet weak var fbButton: UIButton!
    @IBOutlet weak var twitterButton: UIButton!
    @IBOutlet weak var messageButton: UIButton!
    @IBOutlet weak var mailButton: UIButton!
1
2
3
4
5
6
7
8
9
10
11

* 接著用CGAffineTransformMakeTranslation的方式將所有按鈕移到動畫的起始位置,
這邊解釋一下程式中那些數字怎麼決定的,CGAffineTransformMakeTranslation需要給定x y值,如果(0, -300)表示x軸不動,Y軸比原本你在StoryBoard放的位置還要**<span style="color: red;">往上</span>**移300個點的位置,反之(0, 300)則表示比原本擺放的位置**<span style="color: red;">往下</span>**移動300點 ```swift
override func viewDidLoad() {
super.viewDidLoad()
self.fbButton.transform = CGAffineTransformMakeTranslation(0, -300)
self.messageButton.transform = CGAffineTransformMakeTranslation(0, -364)
self.mailButton.transform = CGAffineTransformMakeTranslation(0, 300)
self.twitterButton.transform = CGAffineTransformMakeTranslation(0, 364)
}

  • 接著大家測試一下程式,應該會發現東西的確是跑出螢幕了,接著在viewDidAppear補上以下程式碼就大功告成了!! ```swift
    override func viewDidAppear(animated: Bool) {

      super.viewDidAppear(animated)
    
          //動畫,分成兩個區塊是因為有快有慢,差別在於delay多久再發動,usingSpringWithDamping是彈跳的反作用力,越小越劇烈
      UIView.animateWithDuration(0.9, delay: 0, usingSpringWithDamping: 0.5, initialSpringVelocity: 0.5, options: nil, animations: {
          //跑回原來的點
          let translate = CGAffineTransformMakeTranslation(0, 0)
          self.messageButton.transform = translate
          self.twitterButton.transform = translate
      }, completion: nil)
      UIView.animateWithDuration(0.9, delay: 0.1, usingSpringWithDamping: 0.5, initialSpringVelocity: 0.5, options: nil, animations: {
          let translate = CGAffineTransformMakeTranslation(0, 0)
          self.fbButton.transform = translate
          self.mailButton.transform = translate
      }, completion: nil)
    

    }


以下範例是參考做成的筆記:養成iOS8 App程式設計實力的25堂課:最新Swift開發教學

  • IOS8有提供將圖片霧化的效果,如果我們將一張圖片擺進都不調整的情況下看到的結果如下
  • 如果我們想把它變成這樣呢? [![](http://4.bp.blogspot.com/-qGCntfEZsMQ/VP-ziaQFhLI/AAAAAAAAEig/GI3S3yTBTK0/s320/%E8%9E%A2%E5%B9%95%E5%BF%AB%E7%85%A7%2B2015-03-11%2B%E4%B8%8A%E5%8D%8811.16.07.png)](http://4.bp.blogspot.com/-qGCntfEZsMQ/VP-ziaQFhLI/AAAAAAAAEig/GI3S3yTBTK0/s1600/%E8%9E%A2%E5%B9%95%E5%BF%AB%E7%85%A7%2B2015-03-11%2B%E4%B8%8A%E5%8D%8811.16.07.png)[![](http://1.bp.blogspot.com/-inhOmUeMfVU/VP-ztGG_pxI/AAAAAAAAEio/djWTqz97y0I/s320/%E8%9E%A2%E5%B9%95%E5%BF%AB%E7%85%A7%2B2015-03-11%2B%E4%B8%8A%E5%8D%8811.16.51.png)](http://1.bp.blogspot.com/-inhOmUeMfVU/VP-ztGG_pxI/AAAAAAAAEio/djWTqz97y0I/s1600/%E8%9E%A2%E5%B9%95%E5%BF%AB%E7%85%A7%2B2015-03-11%2B%E4%B8%8A%E5%8D%8811.16.51.png)[![](http://3.bp.blogspot.com/-NJzO9xqbdbg/VP-z3nspMII/AAAAAAAAEiw/Ud6fxww0IgI/s320/%E8%9E%A2%E5%B9%95%E5%BF%AB%E7%85%A7%2B2015-03-11%2B%E4%B8%8A%E5%8D%8811.17.30.png)](http://3.bp.blogspot.com/-NJzO9xqbdbg/VP-z3nspMII/AAAAAAAAEiw/Ud6fxww0IgI/s1600/%E8%9E%A2%E5%B9%95%E5%BF%AB%E7%85%A7%2B2015-03-11%2B%E4%B8%8A%E5%8D%8811.17.30.png)
  • 程式碼撰寫如下: ```swift @IBOutlet weak var backgroundImageView: UIImageView!//背景圖 override func viewDidLoad() { super.viewDidLoad() //.Dark等於圖1 //.ExtraLight等於圖2 //.Light等於圖3 var blurEffect = UIBlurEffect(style: UIBlurEffectStyle.Light) var blurEffectView = UIVisualEffectView(effect: blurEffect) blurEffectView.frame = view.bounds backgroundImageView.addSubview(blurEffectView) }

開始之前想推薦這本書:養成iOS8 App程式設計實力的25堂課:最新Swift開發教學,只能說看了對於初學者的我來說受益良多,而且對於IOS很多觀念也更加清楚了

  • 這邊要實作的功能如下圖
  • IOS8的TableView當中,有個可以往左滑可以選擇更多動作的功能,Apple官方有提供相對應的事件可以實作它
  • 首先先Override TableView commitEditingStyle這個事件,什麼都先不要做就執行看看 ```swift
    func tableView(tableView: UITableView, commitEditingStyle editingStyle: UITableViewCellEditingStyle, forRowAtIndexPath indexPath: NSIndexPath) {
    }
1
2
3
4
5
6
7
8
9
10
11
12
立馬預設的Delete按鈕就跑出來了
[![](http://1.bp.blogspot.com/-maAldiH9hOE/VP6RASa2iQI/AAAAAAAAEiE/3px4PGz4sWU/s400/%E8%9E%A2%E5%B9%95%E5%BF%AB%E7%85%A7%2B2015-03-10%2B%E4%B8%8B%E5%8D%882.36.30.png)](http://1.bp.blogspot.com/-maAldiH9hOE/VP6RASa2iQI/AAAAAAAAEiE/3px4PGz4sWU/s1600/%E8%9E%A2%E5%B9%95%E5%BF%AB%E7%85%A7%2B2015-03-10%2B%E4%B8%8B%E5%8D%882.36.30.png)
* 接著補上以下code,再實際執行看看就可以發現該列可以刪除了 ```swift
func tableView(tableView: UITableView, commitEditingStyle editingStyle: UITableViewCellEditingStyle, forRowAtIndexPath indexPath: NSIndexPath) {
if editingStyle == UITableViewCellEditingStyle.Delete{
//將TableView的DataSource刪除
self.restaurantArray.removeAtIndex(indexPath.row)
//將TableView該列刪除
tableView.deleteRowsAtIndexPaths([indexPath], withRowAnimation: UITableViewRowAnimation.Fade)
}
}

  • 但如果要客製更多按鈕呢?接下來改寫 editActionsForRowAtIndexPath這個事件,但需要特別注意的是如果我們新增了editActionsForRowAtIndexPath這個事件,則IOS就不會預設幫我們增加Delete的按鈕,所以Delete的按鈕也得自己做瞜~

    先把commitEditingStyle恢復成空值,只讓IOS知道我們要左滑出現功能列就好 ```swift
    func tableView(tableView: UITableView, commitEditingStyle editingStyle: UITableViewCellEditingStyle, forRowAtIndexPath indexPath: NSIndexPath) {

    //把剛剛寫的都刪光光
    

    }

1
2
3
4
5
6
7
8
9
10
11
12
接著改寫editActionsForRowAtIndexPath ```swift
func tableView(tableView: UITableView, editActionsForRowAtIndexPath indexPath: NSIndexPath) -> [AnyObject]? {
var shareAction = UITableViewRowAction(style: UITableViewRowActionStyle.Default, title: "Share", handler: nil)
//delete按鈕自己做 var deleteAction = UITableViewRowAction(style: UITableViewRowActionStyle.Default, title: "Delete", handler: {
(action:UITableViewRowAction! , indexPath:NSIndexPath!) -> Void in
self.restaurantArray.removeAtIndex(indexPath.row)
self.restaurantTable.deleteRowsAtIndexPaths([indexPath], withRowAnimation: UITableViewRowAnimation.Fade)
})

return [deleteAction,shareAction]
}

執行看看就可以看到多出了一過按鈕了,如果想改變按鈕的顏色可以這樣寫 ```swift
shareAction.backgroundColor = UIColor(red: 255/255, green: 166/255, blue: 51/255, alpha: 1)

```

  • 最後就可以得出圖1的結果啦!!!!

  • APP常常有一種狀況是當使用者按下某個選項時,從下面滑出更多的選項讓它做進一步動作,例如在iphone的照片點選垃圾桶時

  • 在IOS 8中多了一個UIAlertController的類別來取代UIAlerView,實際作法如下
    首先將程式碼加到viewDidAppear,否則無法顯示效果,原因請看IOS生命週期的說明點我 ```swift
    override func viewDidAppear(animated: Bool) {

      //建立UIAlertController
      let quetion = UIAlertController(title: nil, message: "What Do u want?", preferredStyle: .ActionSheet);
      //新增選項
      let callaction = UIAlertAction(title: "call xxx", style: .Default , handler:nil);
      //把選項加到UIAlertController
      quetion.addAction(callaction);
      //Show
      self.presentViewController(quetion, animated: true, completion: nil);
    

    }

1
2
3
4
5
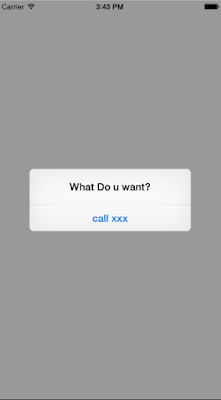
執行看到的結果如下圖
[![](http://3.bp.blogspot.com/-FSopEARqG_0/VP1Oau8suBI/AAAAAAAAEhc/v6cpxkt6bWc/s400/%E8%9E%A2%E5%B9%95%E5%BF%AB%E7%85%A7%2B2015-03-09%2B%E4%B8%8B%E5%8D%883.39.39.png)](http://3.bp.blogspot.com/-FSopEARqG_0/VP1Oau8suBI/AAAAAAAAEhc/v6cpxkt6bWc/s1600/%E8%9E%A2%E5%B9%95%E5%BF%AB%E7%85%A7%2B2015-03-09%2B%E4%B8%8B%E5%8D%883.39.39.png)
* 如果將ActionSheet改成Alert,則結果 ```swift
let quetion = UIAlertController(title: nil, message: "What Do u want?", preferredStyle: .Alert);

  • 如果更進階一些,在選擇選項後有些回應時
    我們拉一個label到ViewController裡面來,並且在按下call xxx選項時,把label的字樣給改變 ```swift
    class AlertViewController: UIViewController {
    @IBOutlet weak var showaction: UILabel!
    override func viewDidLoad() {
      super.viewDidLoad();
    
    }
    override func viewDidAppear(animated: Bool) {
      let quetion = UIAlertController(title: nil, message: "What Do u want?", preferredStyle: .Alert);
      let callaction = UIAlertAction(title: "call xxx",style: .Default, handler:{
          (action:UIAlertAction!) -> Void in
          self.showaction.text = "Do call xxx";
      });
      quetion.addAction(callaction);
      self.presentViewController(quetion, animated: true, completion: nil);
    
    }
    }

```
執行看看吧!!

  • 我將這個Function寫在extension裡面,首先Swift要能用MD5的function必須先建立header檔並掛上(header檔如何建立請看這篇) ```swift
    #import <CommonCrypto/CommonCrypto.h>
1
2
3
4
5
6
7
8
9
10
11
12
13
14

* 然後 ```swift
func md5() -> String! {
let str = self.cStringUsingEncoding(NSUTF8StringEncoding)
let strLen = CUnsignedInt(self.lengthOfBytesUsingEncoding(NSUTF8StringEncoding))
let digestLen = Int(CC_MD5_DIGEST_LENGTH)
let result = UnsafeMutablePointer<CUnsignedChar>.alloc(digestLen)
CC_MD5(str!, strLen, result)
var hash = NSMutableString()
for i in 0..<digestLen {
hash.appendFormat("%02x", result[i])
}
result.destroy()
return String(format: hash)}

Swift這個語法常常會遇到參數型態間的轉換,寫慣了C#,常常遇到什麼參數轉換就會想要.toString() .toInt()阿之類的,偏偏Swift沒有這些function不打緊,還每種型態的變數互轉常常方式不一樣….搞得我每次遇到都要查一下到底這次又該用哪個function來轉換好,最後索性就把這些整理起來做成Extension,以後就跟C#一樣to啥to啥的就好.

  • 那接下來就來介紹怎麼擴充Swift的function語法
  • extension是關鍵字,擴充String類別型態的function ```swift
    extension String{
    func toDoublue() -> Double{
      return (self as NSString).doubleValue;
    
    }
    }

```

  • 結果