0%

如果你作業系統是從英文版安裝與語系版本成為中文版的話,安裝SQL繁體中文版應該會遇到不明的錯誤而停止,上網找了一下資料發現這篇:
解決 Windows 7 線上更新語言包後安裝 SQL Server 2008 R2 繁體中文版失敗的問題

原因是從英文版透過語系包轉成的中文版的作業系統,他是香港繁體中文版,在安裝SQL時預設會去抓3076_ZHH_LP這個資料夾,但繁體中文版的SQL Server的資料夾為1028_CHT_LP。

所以解決方法就是,把全部的光碟內容複製下來,並且將1028_CHT_LP複製一份並且改名為3076_ZHH_LP,用這個資料夾安裝就可以順利完成了

[![](http://1.bp.blogspot.com/-ygIcfJtBNic/VPp9GMAHE0I/AAAAAAAAEgk/oi6kUT_rkfc/s1600/%E6%9C%AA%E5%91%BD%E5%90%8D.png)](http://1.bp.blogspot.com/-ygIcfJtBNic/VPp9GMAHE0I/AAAAAAAAEgk/oi6kUT_rkfc/s1600/%E6%9C%AA%E5%91%BD%E5%90%8D.png)

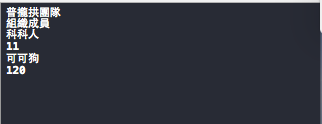
  • 先做一個json檔案來模擬接到時怎麼解析 ```csharp
    {
    “組織名稱”:”普攏拱團隊”,
    “組織成員”:[
    {“姓名”:”科科人”,”年齡”:11},
    {“姓名”:”可可狗”,”年齡”:120}
    ]
    }
1
2
3
4
5
6
7
8
9
10
11
12
13
14
15
16
17

* 在viewDidLoad加上,測試看看!! ```swift
//將檔案讀出來
let path = NSBundle.mainBundle().pathForResource("json", ofType: "txt");
var data:NSData = NSData(contentsOfFile: path!)!;
//解析Json
var jsonobj = NSJSONSerialization.JSONObjectWithData(data, options: NSJSONReadingOptions.MutableContainers, error: nil) as NSDictionary;
println(jsonobj["組織名稱"] as String);
println("組織成員");
var arr = jsonobj["組織成員"] as NSArray;
for i in (0...arr.count - 1){
let mdic = arr[i] as NSDictionary;
println(mdic["姓名"] as String);
println(mdic["年齡"] as Int);
}


主要參考兩篇文章做修改:
Detect Internet status programmatically using Swift and Object-C language
[iOS] 即時判斷網路連線狀態 (Detect Network Status on Real-Time)

  • Apple已經用Objective-C寫了判斷網路的套件給大家使用,所以接下來會解說如何用Swift專案載入Objective-C套件
  • 先到這邊下載Reachability
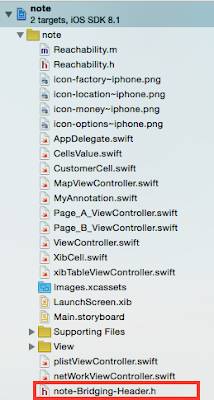
  • 接著把Reachability專案中的Reachability.m和Reachability.h抓到專案中
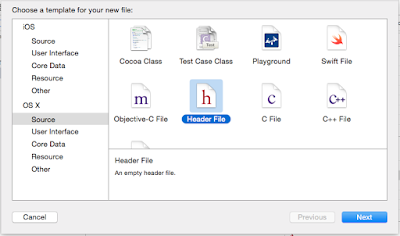
  • 在專案中新增Header檔

  • 打開Header檔,把Reachability.h掛進去,這樣以後專案中引用Reachability裡面的class都不再Import了
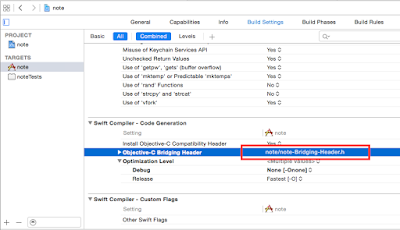
  • 把Header檔加到專案的Build Setting中
  • 打開Reachability.m找到(void)dealloc改成 ```swift
  • (void)dealloc
    {
    [self stopNotifier];
    if (_reachabilityRef != NULL)
    {
    CFRelease(_reachabilityRef);
    }
    [super dealloc];
    }
1
2
3
4
5
6
7
8
9
10
11
12
13
14
15
16
17
18
19
20
21
22
23
24
25

* 到專案中的Build Phases,把Reachability.m加上-fno-objc-arc [![](http://1.bp.blogspot.com/-iCs_Qc3MS_g/VPfP4egfeoI/AAAAAAAAEfg/loz5m7jQjpU/s400/%E8%9E%A2%E5%B9%95%E5%BF%AB%E7%85%A7%2B2015-03-05%2B%E4%B8%8A%E5%8D%8811.38.54.png)](http://1.bp.blogspot.com/-iCs_Qc3MS_g/VPfP4egfeoI/AAAAAAAAEfg/loz5m7jQjpU/s1600/%E8%9E%A2%E5%B9%95%E5%BF%AB%E7%85%A7%2B2015-03-05%2B%E4%B8%8A%E5%8D%8811.38.54.png)
* 以上就全部掛載完成了,接著來看看這個套件如何使用,並讓它告知我們網路狀態
打開view controller,新增一個監測網路的變數,並且在viewDidLoad寫下 ```swift
var internetReachability:Reachability!; //網路狀態監控
override func viewDidLoad() {
super.viewDidLoad()
//在通知中心註冊事件,當網路狀態有變動的時候會觸發
NSNotificationCenter.defaultCenter().addObserverForName(kReachabilityChangedNotification, object: nil, queue: NSOperationQueue.mainQueue()) { (NSNotification) -> Void in
let networksStatus: NetworkStatus = self.internetReachability.currentReachabilityStatus()
var status: String!
if networksStatus.value == 0 {
status = "Disconnection"
} else if networksStatus.value == 1 {
status = "Connection"
} else {
status = "Connection"
}
UIAlertView(title: "網路狀態", message: status, delegate: nil, cancelButtonTitle: "OK").show();
}
self.internetReachability = Reachability.reachabilityForInternetConnection();
//開始監控狀況
self.internetReachability.startNotifier()
}

在Mac上面執行看看,測試方法就是把mac的wifi連線給關閉,就會看到App跳出提示訊息了

  • 接下來把viewDidLoad改成如下,這段是告訴你目前使用的網路是什麼?Wifi or 3G之類的 ```swift
    override func viewDidLoad() {
      super.viewDidLoad()
      let statusReach: Reachability = Reachability.reachabilityForInternetConnection()
      let networksStatus: NetworkStatus = statusReach.currentReachabilityStatus()
      var status: String!
      if networksStatus.value == 0 {
          status = "NoReachable"
      } else if networksStatus.value == 1 {
          status = "ReachableViaWiFi"
      } else {
          status = "ReachableViaWWAN"
      }
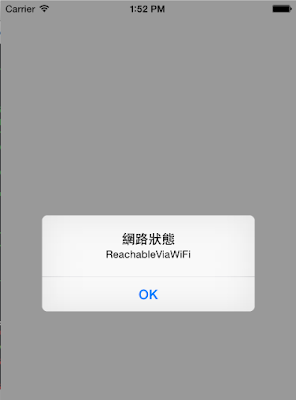
      UIAlertView(title: "網路狀態", message: status, delegate: nil, cancelButtonTitle: "OK").show();
    
    }

```
執行看看

為了避免撈取API資料太久而讓整個APP卡住,所以建議撈取API資料時都另外開出一個queue來非同步執行 ```swift
var url:NSURL = NSURL(string: “http://xxx.com.tw/api/getdata")!;
let request:NSMutableURLRequest = NSMutableURLRequest(URL: url, cachePolicy: NSURLRequestCachePolicy.ReloadIgnoringLocalCacheData, timeoutInterval: 10);
request.HTTPMethod = “POST”;
request.HTTPBody = “yourdata”.dataUsingEncoding(NSUTF8StringEncoding);

//新增一個queue來執行API,避免API撈取資料太久把整個APP卡住
let queue :NSOperationQueue = NSOperationQueue();
//非同步方式取得資料
NSURLConnection.sendAsynchronousRequest(request, queue: queue, completionHandler:{ (response: NSURLResponse!, data: NSData!, error: NSError!) -> Void in
var err:String? = error?.description;
if(data != nil && error == nil)
{
let responseString = NSString(data: data, encoding: NSUTF8StringEncoding);
println(“responseString = (responseString)”);
}
});


用Post方式傳遞資料

1
2
3
4
5
6
7
8
9
10
11
12
13
14
15
16
17
18
19
20
21
var url:NSURL = NSURL(string: "http://xxx.com.tw/api/postdata")!;
let request:NSMutableURLRequest = NSMutableURLRequest(URL: url, cachePolicy: NSURLRequestCachePolicy.ReloadIgnoringLocalCacheData, timeoutInterval: 10);
request.HTTPMethod = "POST";
request.HTTPBody = "yourPostData".dataUsingEncoding(NSUTF8StringEncoding);

let task = NSURLSession.sharedSession().dataTaskWithRequest(request) {
data, response, error in

if error != nil {
println("error=\(error)")
return
}

println("response = \(response)")

//將收到的資料轉成字串print出來看看
let responseString = NSString(data: data, encoding: NSUTF8StringEncoding)
println("responseString = \(responseString)")
}
task.resume();

用Get方式傳遞資料 ```swift
var url:NSURL = NSURL(string: “http://xxx.com.tw/api/getdata?id=5008&id=5009")!;
let request:NSURLRequest = NSURLRequest(URL: url, cachePolicy: NSURLRequestCachePolicy.ReloadIgnoringLocalCacheData, timeoutInterval: 10);

let task = NSURLSession.sharedSession().dataTaskWithRequest(request) { data, response, error in
if error != nil {
println(“error=(error)”)
return
}

println(“response = (response)”)

let responseString = NSString(data: data, encoding: NSUTF8StringEncoding)
println(“responseString = (responseString)”)
}
task.resume();

```

這邊整理一下從網路上找的NSURLRequestCachePolicy相關資訊,轉載自:iOS?存?存

  • ReloadIgnoringCacheData:忽略Cache數據,直接從原始網址下載。
  • ReloadRevalidatingCacheData:驗證本地的數據和遠端數據是否相同,如果不同則下?遠端?據,否?使用本地數據。* ReturnCacheDataDontLoad:只使用cache?據,如果不存在cache,請求失敗;用於?有建立網路連接離線模式;* ReturnCacheDataElseLoad: 只有在cache中不存在data時才從原始地址下?。* UseProtocolCachePolicy: NSURLRequest默認的cache policy,使用Protocol協議定義。* ReloadIgnoringLocalAndRemoteCacheData:忽略本地和遠端的緩存數據,直接從原始地址下?,與ReloadIgnoringCacheData類似。

很多APP都會有一些各人化設定檔,方便下次打開APP可以依照個人的喜好設定做出最適合的調整,接下來就實作如何將個人的設定檔存起來並在下次打開APP時Show出來

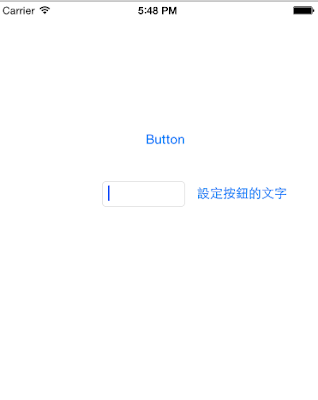
  • 首先先拉一個畫面,輸入框,確定按鈕,呈現文字的按鈕,我們的目標是在輸入框輸入的文字會被系統儲存起來,在下次App重開時依然顯示最後設定的文字
  • 基本的code如下,只要在輸入框填好後按下確定按鈕就可以更改文字了,但你只要重開APP他就又會回到最原本Button的文字 ```swift
    import UIKit
    class plistViewController: UIViewController {
    @IBOutlet weak var txtbox: UITextField! //輸入文字框
    @IBOutlet weak var btnShowText: UIButton! //show文字的button
    @IBOutlet weak var btnSetting: UIButton! //確定按鈕
    override func viewDidLoad() {
      super.viewDidLoad();
    
    }
    @IBAction func btnSetting_click(sender: AnyObject) {
      //將輸入的文字設定給btnShowText
      btnShowText.setTitle(txtbox.text, forState: UIControlState.Normal);
    
    }
    }
1
2
3
4
5
6
7
8
9
10
11
12
13
14
15
16
17
18
19
20
21
22
[![](http://1.bp.blogspot.com/-9CI9oydHno0/VPWJqOmri8I/AAAAAAAAEd4/dbIiK5hekEI/s400/image.gif)](http://1.bp.blogspot.com/-9CI9oydHno0/VPWJqOmri8I/AAAAAAAAEd4/dbIiK5hekEI/s1600/image.gif)
* 所以我們至少應該先把按鈕的文字改成抓Plist檔的來源,然後按下確定按鈕時將文字先存到plist檔中,但這邊有個觀念需要先釐清,**<span style="color: red;">基本上IOS APP是SandBox模式</span>**,所以只有特定資料夾內的檔案是可以寫入的,所以在這之前我們必須先新建一個Setting.plist檔案專門放設定值(建議不要用原本預設的info.plist,因為之後會移動這個檔案位置),然後在APP開啟時檢查這個檔案是否在可讀寫的資料夾之中了,如果沒有則複製一份過去,步驟如下

先在Setting.plist新增儲存按鈕文字的欄位
[![](http://3.bp.blogspot.com/-OC9a4bKFHCA/VPWKf_BN2oI/AAAAAAAAEeA/L_A21cnwvR4/s400/%E8%9E%A2%E5%B9%95%E5%BF%AB%E7%85%A7%2B2015-03-03%2B%E4%B8%8B%E5%8D%886.17.54.png)](http://3.bp.blogspot.com/-OC9a4bKFHCA/VPWKf_BN2oI/AAAAAAAAEeA/L_A21cnwvR4/s1600/%E8%9E%A2%E5%B9%95%E5%BF%AB%E7%85%A7%2B2015-03-03%2B%E4%B8%8B%E5%8D%886.17.54.png)

接著在AppDelegate.swift的didFinishLaunchingWithOptions寫下 ```swift
func application(application: UIApplication, didFinishLaunchingWithOptions launchOptions: [NSObject: AnyObject]?) -> Bool {
// Override point for customization after application launch.
//Setting Plist因為要可以讀寫,所以要移到Documents的folder底下
let path:String = NSBundle.mainBundle().pathForResource("Setting", ofType: "plist")!;
let destinationPath = String(format: "%@/Documents/Setting.plist", arguments:[NSHomeDirectory()]);
var fm: NSFileManager = NSFileManager();
if (!fm.fileExistsAtPath(destinationPath))
{
//如果在documents資料夾底下找不到該檔案,則複製一份過去
fm.copyItemAtPath(path, toPath: destinationPath, error: nil);
}
return true
}


接下來將輸入的文字改存到plist中,然後按鈕文字的來源改成Setting.plist,全部程式碼如下 ```swift
import UIKit
class plistViewController: UIViewController {
@IBOutlet weak var txtbox: UITextField! //輸入文字框
@IBOutlet weak var btnShowText: UIButton! //show文字的button
@IBOutlet weak var btnSetting: UIButton! //確定按鈕
override func viewDidLoad() {
super.viewDidLoad();
loadBtnText();
}
private func loadBtnText(){
//button預設的字由Setting plist來
btnShowText.setTitle(getSettingValue(), forState: UIControlState.Normal);
}
@IBAction func btnSetting_click(sender: AnyObject) {
//將輸入的文字設定給btnShowText
//btnShowText.setTitle(txtbox.text, forState: UIControlState.Normal);
//修改成將輸入的文字存到Setting.plist後,在由那邊load給button
Set_SettingPlist_Value(txtbox.text);
loadBtnText();
}
//取得Setting.plist裡btnText欄位得值
private func getSettingValue() -> String{
var value:String!;
//取得document folder底下的Setting.plist路徑
let SettingPath = String(format: “%@/Documents/Setting.plist”, arguments:[NSHomeDirectory()]);
var dic:NSMutableDictionary? = NSMutableDictionary(contentsOfFile: SettingPath);
//欄位名稱
if (dic?.objectForKey(“btnText”) != nil){
value = dic!.objectForKey(“btnText”) as String;
}
return value;
}
//把值存到Setting.plist裡面
private func Set_SettingPlist_Value(value:String){
let SettingPath = String(format: “%@/Documents/Setting.plist”, arguments:[NSHomeDirectory()]);
var dic:NSMutableDictionary = NSMutableDictionary(contentsOfFile: SettingPath)!;
if (dic.objectForKey(“btnText”) != nil) {
dic.setValue(value, forKey: “btnText”);
//true表示IOS會先將資料寫入一個輔助檔案中,然後再將這個檔案改為最後真正的目的地,避免出現錯誤
dic.writeToFile(SettingPath, atomically: true);
}
}
}

1
2
3
4
5
6
7
8
9

* 接下來再試試看程式,你會發現即便把APP關掉,下次進來時button的文字會被記錄下來!!
但這邊必須特別注意一點,隨著App的開發可能會對plist有刪減,重新部署到模擬器上時要記得先把舊的APP刪掉,讓Xode幫你重新安裝,原因是我們在AppDelegate.swift的didFinishLaunchingWithOptions寫了 ```swift
if (!fm.fileExistsAtPath(destinationPath))
{
//如果在documents資料夾底下找不到該檔案,則複製一份過去
fm.copyItemAtPath(path, toPath: destinationPath, error: nil);
}

也就是說複製過一次後,之後的欄位有增減都無法改到Documents資料夾底下的那份plist了,所以只能刪除重裝!!

網路上有找到Google的計算公式,把它翻譯成Swift的語法後如下,回傳單位為**公里 **

1
2
3
4
5
6
7
8
9
10
11
12
13
14
15
16
public static func GetDistance_Google(pointA:CLLocationCoordinate2D , pointB:CLLocationCoordinate2D) -> Double
{
let EARTH_RADIUS:Double = 6378.137;

let radlng1:Double = pointA.longitude * M_PI / 180.0;
let radlng2:Double = pointB.longitude * M_PI / 180.0;

let a:Double = radlng1 - radlng2;
let b:Double = (pointA.latitude - pointB.latitude) * M_PI / 180;
var s:Double = 2 * asin(sqrt(pow(sin(a/2), 2) + cos(radlng1) * cos(radlng2) * pow(sin(b/2), 2)));

s = s * EARTH_RADIUS;
s = (round(s * 10000) / 10000);
return s;
}

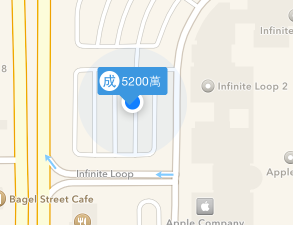
  • 接著上一篇,如果這時候我們再把mapkit view的user location打開來試試看,結果會發現user location的點被吃掉了,原因是我們改寫了viewForAnnotation,所有的點都會變成我們客製座標的樣式
  • 所以我們在viewForAnnotation補上判斷,讓user location不會被改變樣式 ```swift
    func mapView(mapView: MKMapView!, viewForAnnotation annotation: MKAnnotation!) -> MKAnnotationView! {
      if(annotation is MKUserLocation){
          //return nil表示用預設值那個藍色發光圓形圖
          return nil;
      }
      var ann : MyAnnotation? = mapView.dequeueReusableAnnotationViewWithIdentifier("CustomerPoint") as? MyAnnotation;
      if(ann == nil){
          ann = MyAnnotation(annotation: annotation, reuseIdentifier: "CustomerPoint");
          ann?.canShowCallout = true;
      }
      ann?.DrawCustomerView();
      ann?.annotation = annotation;
      return ann;
    
    }

```
結果如下,user location又出來摟~

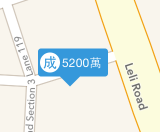
繼續接續上一篇,我們來把大頭針改成自己想要的樣子吧,已這張圖為例

  • 從上面那張圖可以看出來需要畫一個長方形,長方形裡面有一個title與圓形Icon,還需要一個倒三角形把它組回去,所以先來把這些元素準備一下吧
    首先先建立一個Class繼承MKAnnotationView ```swift
    import Foundation
    import MapKit
    public class MyAnnotation : MKAnnotationView {
    var rectangoView:UIView!; //長方形
    var lblTitle:UILabel!;//Title
    var lblIcon:UILabel!;//圓形icon
    var circleView:UIView!; //原型view
    var triangle:UIView!; //三角形
    public override init(annotation: MKAnnotation!, reuseIdentifier: String!) {

      super.init(annotation: annotation, reuseIdentifier: reuseIdentifier);
    

    }

      public required init(coder aDecoder: NSCoder) {
      super.init(coder: aDecoder);
    

    }
    }

1
2
3
4
5
6
7
8
9
10
11
12
13
14
15
16
17
18
19
20
21
22
23
24
25
26
27
28
29
30
31
32
33
34
35
36
37
38
39
40
41
42
43
44
45
46
47

* 接著把每個圖形間的關係組合起來,例如圓形跟title都在大大的長方形裡面,所以先將他們add到rectangoView裡面 ```swift
import Foundation
import MapKit
public class MyAnnotation : MKAnnotationView {
var rectangoView:UIView!; //長方形
var lblTitle:UILabel!;//Title
var lblIcon:UILabel!;//圓形icon
var circleView:UIView!; //原型view
var triangle:UIView!; //三角形
var DrawView:UIView!;//整個客製座標的畫布
public override init!(annotation: MKAnnotation!, reuseIdentifier: String!) {
super.init(annotation: annotation, reuseIdentifier: reuseIdentifier);
//先把每個圖層間的關係建立好,例如圓形跟title都在大大的長方形裡面,所以先add進去
lblTitle = UILabel();
lblIcon = UILabel();
rectangoView = UIView();
circleView = UIView();

circleView.addSubview(lblIcon);
rectangoView.addSubview(lblTitle)
rectangoView.addSubview(circleView);

//畫出三角形遮罩
//原理:將遮罩蓋到長方形上面,他會將不再這個框框範圍內的都過濾掉,就可以跑出三角形了
let path:UIBezierPath = UIBezierPath ();
path.moveToPoint(CGPoint(x: 0, y: 0));
path.addLineToPoint(CGPoint(x: 10, y: 10));
path.addLineToPoint(CGPoint(x: 20, y: 0));
path.addLineToPoint(CGPoint(x: 0, y: 0));

let masklayer:CAShapeLayer = CAShapeLayer ();//遮罩
masklayer.path = path.CGPath;
//遮罩遮出三角型
triangle = UIView(frame: CGRect(x: 22, y: 28, width: 20, height: 20));
triangle.layer.mask = masklayer;
DrawView = UIView();
DrawView.addSubview(rectangoView);
DrawView.addSubview(triangle);
self.addSubview(DrawView);
}

public required init(coder aDecoder: NSCoder) {
super.init(coder: aDecoder);
}
}

  • 接著在MyAnnotation寫一個function來詳細畫這個View的內容 ```swift
    public func DrawCustomerView() {
      //Title
      lblTitle.text = "5200萬";
      lblTitle.textColor = UIColor.whiteColor();
      lblTitle.font = UIFont.systemFontOfSize(12);
      lblTitle.sizeToFit();
      //大大的長方形
      rectangoView.frame = CGRect(x: 0, y: 0, width: lblTitle.frame.width + 30, height: 28);//整體
      rectangoView.backgroundColor =  UIColor(red: 0.208, green:0.596 , blue: 0.859, alpha: 1);
      rectangoView.layer.cornerRadius = 3;//設定圓角
      //“icon”圓型小字
      lblIcon.font = UIFont.systemFontOfSize(11);
      lblIcon.font = UIFont.boldSystemFontOfSize(14);
      lblIcon.text = "成";
      lblIcon.textColor = rectangoView.backgroundColor;
      lblIcon.sizeToFit();
      lblIcon.center = CGPoint (x: 10, y: 10);
      //圓形
      circleView.frame = CGRect(x: 2, y: 4, width: 20, height: 20);//圓形標籤
      circleView.backgroundColor = UIColor.whiteColor();
      circleView.layer.cornerRadius = 10;
      circleView.alpha = 1;
      //畫三角形
      triangle.backgroundColor =  UIColor(red: 0.208, green:0.596 , blue: 0.859, alpha: 1);
      //rectangoView.Transform 旋轉
      DrawView.frame = CGRect(x: 0, y: 0, width:triangle.frame.width,height: 48);
    
    }
1
2
3
4
5
6
7
8
9
10
11
12
13

* 接下來修改view controller的viewForAnnotation事件如下 ```swift
func mapView(mapView: MKMapView!, viewForAnnotation annotation: MKAnnotation!) -> MKAnnotationView! {
var ann : MyAnnotation? = mapView.dequeueReusableAnnotationViewWithIdentifier("CustomerPoint") as? MyAnnotation;
if(ann == nil){
ann = MyAnnotation(annotation: annotation, reuseIdentifier: "CustomerPoint");
ann?.canShowCallout = true;
}
ann?.DrawCustomerView();
ann?.annotation = annotation;
return ann;
}

  • 立馬執行看看,你會發現發生錯誤在MyAnnotation class,而且錯誤訊息寫得不清不楚的,這是第一個地雷,雖然繼承MKAnnotationView沒有要求一定要實作init(frame: CGRect),但不做會壞掉喔,那到底幹麻不列為required阿!!!所以乖乖補上到MyAnnotation就正常摟 ```swift
    override init(frame: CGRect) {
      super.init(frame: frame);
    
    }
1
2
3
4
5
6
7

* 這時候會發現畫面長這樣...
[![](http://4.bp.blogspot.com/-OGPbgnJnyH0/VPVpfcMNstI/AAAAAAAAEcs/NGAf74G1IoU/s1600/%E8%9E%A2%E5%B9%95%E5%BF%AB%E7%85%A7%2B2015-03-03%2B%E4%B8%8B%E5%8D%883.57.37.png)](http://4.bp.blogspot.com/-OGPbgnJnyH0/VPVpfcMNstI/AAAAAAAAEcs/NGAf74G1IoU/s1600/%E8%9E%A2%E5%B9%95%E5%BF%AB%E7%85%A7%2B2015-03-03%2B%E4%B8%8B%E5%8D%883.57.37.png)
請在DrawCustomerView這個地方補上下面這段code,讓文字位移後執行看看會變得正常多了 ```swift
lblTitle.frame.origin.x = 24;//中心位移
lblTitle.frame.origin.y = 7;

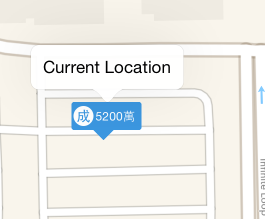
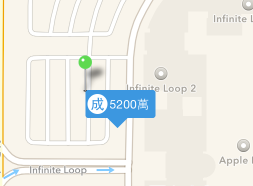
  • 接下來我們測試一下這個畫出來的點是否跟插大頭針指的位置相同,結果…..歪掉了
  • 但我們可以看出來他是在針頭的地方開始畫,所以來做點加工吧,在DrawCustomerView()最後面加上下面的code讓整個View位移來符合需求 ```swift
    self.frame = CGRect(x: 0, y: 0, width: rectangoView.frame.width, height: rectangoView.frame.height);
      self.centerOffset = CGPoint(x: 0, y: -21);
    
1
2
3
4
5
6
7
8
9
10
11
12
13
14
15
16
17
18
19
20
21
22
23
24
25
26
27
28
29
30
31
32
33
34
35
36
37
38
39
40
41
42
43
44
45
46
47
48
49
50
51
52
53
54
55
56
57
58
59
我們再看看...
[![](http://3.bp.blogspot.com/-mPNj85zu_a8/VPVsk5Xv-9I/AAAAAAAAEdA/faM54vpHC28/s400/%E8%9E%A2%E5%B9%95%E5%BF%AB%E7%85%A7%2B2015-03-03%2B%E4%B8%8B%E5%8D%884.10.45.png)](http://3.bp.blogspot.com/-mPNj85zu_a8/VPVsk5Xv-9I/AAAAAAAAEdA/faM54vpHC28/s1600/%E8%9E%A2%E5%B9%95%E5%BF%AB%E7%85%A7%2B2015-03-03%2B%E4%B8%8B%E5%8D%884.10.45.png)
* 看起來一切正常了,把一些測試的程式碼拿掉後完整如下
view controller ```swift
import UIKit
import CoreLocation
import MapKit
class MapViewController: UIViewController,CLLocationManagerDelegate , MKMapViewDelegate{

@IBOutlet weak var uimap: MKMapView!//地圖元件
var location : CLLocationManager!; //座標管理元件
override func viewDidLoad() {
super.viewDidLoad();

location = CLLocationManager();
location.delegate = self;
//詢問使用者是否同意給APP定位功能
location.requestWhenInUseAuthorization();
//開始接收目前位置資訊
location.startUpdatingLocation();
location.distanceFilter = CLLocationDistance(10); //表示移動10公尺再更新座標資訊
uimap.delegate = self;
}

override func viewDidDisappear(animated: Bool) {
//因為GPS功能很耗電,所以被敬執行時關閉定位功能
location.stopUpdatingLocation();
}
func locationManager(manager: CLLocationManager!, didUpdateLocations locations: [AnyObject]!) {
//取得目前的座標位置
let c = locations[0] as CLLocation;
let nowLocation = CLLocationCoordinate2D(latitude: c.coordinate.latitude, longitude: c.coordinate.longitude);
//將map中心點定在目前所在的位置
//span是地圖zoom in, zoom out的級距
let _span:MKCoordinateSpan = MKCoordinateSpan(latitudeDelta: 0.0005, longitudeDelta: 0.0005);
self.uimap.setRegion(MKCoordinateRegion(center: nowLocation, span: _span), animated: true);
//加入座標
addPointAnnotation(c.coordinate.latitude, longitude: c.coordinate.longitude);
}
//新增座標
private func addPointAnnotation(latitude:CLLocationDegrees , longitude:CLLocationDegrees){
//大頭針
var point:MKPointAnnotation = MKPointAnnotation();
//設定大頭針的座標位置
point.coordinate = CLLocationCoordinate2D(latitude: latitude, longitude: longitude);
uimap.addAnnotation(point);
}
func mapView(mapView: MKMapView!, viewForAnnotation annotation: MKAnnotation!) -> MKAnnotationView! {
var ann : MyAnnotation? = mapView.dequeueReusableAnnotationViewWithIdentifier("CustomerPoint") as? MyAnnotation;
if(ann == nil){
ann = MyAnnotation(annotation: annotation, reuseIdentifier: "CustomerPoint");
ann?.canShowCallout = true;
}
ann?.DrawCustomerView();
ann?.annotation = annotation;
return ann;
}
}

MyAnnotation Class完整如下

1
2
3
4
5
6
7
8
9
10
11
12
13
14
15
16
17
18
19
20
21
22
23
24
25
26
27
28
29
30
31
32
33
34
35
36
37
38
39
40
41
42
43
44
45
46
47
48
49
50
51
52
53
54
55
56
57
58
59
60
61
62
63
64
65
66
67
68
69
70
71
72
73
74
75
76
77
78
79
import Foundation
import MapKit
public class MyAnnotation : MKAnnotationView {
var rectangoView:UIView!; //長方形
var lblTitle:UILabel!;//Title
var lblIcon:UILabel!;//圓形icon
var circleView:UIView!; //原型view
var triangle:UIView!; //三角形
var DrawView:UIView!;//整個客製座標的畫布
override init(annotation: MKAnnotation!, reuseIdentifier: String!) {
super.init(annotation: annotation, reuseIdentifier: reuseIdentifier);
//先把每個圖層間的關係建立好,例如圓形跟title都在大大的長方形裡面,所以先add進去
lblTitle = UILabel();
lblIcon = UILabel();
rectangoView = UIView();
circleView = UIView();

circleView.addSubview(lblIcon);
rectangoView.addSubview(lblTitle)
rectangoView.addSubview(circleView);

//畫出三角形遮罩
//原理:將遮罩蓋到長方形上面,他會將不再這個框框範圍內的都過濾掉,就可以跑出三角形了
let path:UIBezierPath = UIBezierPath ();
path.moveToPoint(CGPoint(x: 0, y: 0));
path.addLineToPoint(CGPoint(x: 10, y: 10));
path.addLineToPoint(CGPoint(x: 20, y: 0));
path.addLineToPoint(CGPoint(x: 0, y: 0));

let masklayer:CAShapeLayer = CAShapeLayer ();//遮罩
masklayer.path = path.CGPath;
//遮罩遮出三角型
triangle = UIView(frame: CGRect(x: 22, y: 28, width: 20, height: 20));
triangle.layer.mask = masklayer;
DrawView = UIView();
DrawView.addSubview(rectangoView);
DrawView.addSubview(triangle);
self.addSubview(DrawView);
}

public required init(coder aDecoder: NSCoder) {
super.init(coder: aDecoder);
}
override init(frame: CGRect) {
super.init(frame: frame);
}
public func DrawCustomerView() {
//Title
lblTitle.text = "5200萬";
lblTitle.textColor = UIColor.whiteColor();
lblTitle.font = UIFont.systemFontOfSize(12);
lblTitle.frame.origin.x = 24;//中心位移
lblTitle.frame.origin.y = 7;
lblTitle.sizeToFit();
//大大的長方形
rectangoView.frame = CGRect(x: 0, y: 0, width: lblTitle.frame.width + 30, height: 28);//整體
rectangoView.backgroundColor = UIColor(red: 0.208, green:0.596 , blue: 0.859, alpha: 1);
rectangoView.layer.cornerRadius = 3;//設定圓角
//“icon”圓型小字
lblIcon.font = UIFont.systemFontOfSize(11);
lblIcon.font = UIFont.boldSystemFontOfSize(14);
lblIcon.text = "成";
lblIcon.textColor = rectangoView.backgroundColor;
lblIcon.sizeToFit();
lblIcon.center = CGPoint (x: 10, y: 10);
//圓形
circleView.frame = CGRect(x: 2, y: 4, width: 20, height: 20);//圓形標籤
circleView.backgroundColor = UIColor.whiteColor();
circleView.layer.cornerRadius = 10;
circleView.alpha = 1;
//畫三角形
triangle.backgroundColor = UIColor(red: 0.208, green:0.596 , blue: 0.859, alpha: 1);
//rectangoView.Transform 旋轉
DrawView.frame = CGRect(x: 0, y: 0, width:triangle.frame.width,height: 48);
self.frame = CGRect(x: 0, y: 0, width: rectangoView.frame.width, height: rectangoView.frame.height);
self.centerOffset = CGPoint(x: 0, y: -21);
}
}

承上一篇的Code我們繼續往下延伸,如何在地圖釘上大頭針呢?
首先我們把mapkit view的user location選項關閉,改成自己放上去的大頭針試試看

  • 把程式修改如下,這邊主要著重在addPointAnnotation這個function ```swift
    import UIKit
    import CoreLocation
    import MapKit
    class MapViewController: UIViewController,CLLocationManagerDelegate {

      @IBOutlet weak var uimap: MKMapView!//地圖元件
    

    var location : CLLocationManager!; //座標管理元件
    override func viewDidLoad() {

      super.viewDidLoad();
    
          location = CLLocationManager();
      location.delegate = self;
      //詢問使用者是否同意給APP定位功能
      location.requestWhenInUseAuthorization();
      //開始接收目前位置資訊
      location.startUpdatingLocation();
      location.distanceFilter = CLLocationDistance(10); //表示移動10公尺再更新座標資訊
    

    }

      override func viewDidDisappear(animated: Bool) {
      //因為GPS功能很耗電,所以被敬執行時關閉定位功能
      location.stopUpdatingLocation();
    

    }
    func locationManager(manager: CLLocationManager!, didUpdateLocations locations: [AnyObject]!) {

      //取得目前的座標位置
      let c = locations[0] as CLLocation;
      let nowLocation = CLLocationCoordinate2D(latitude: c.coordinate.latitude, longitude: c.coordinate.longitude);
      //將map中心點定在目前所在的位置
      //span是地圖zoom in, zoom out的級距
      let _span:MKCoordinateSpan = MKCoordinateSpan(latitudeDelta: 0.0005, longitudeDelta: 0.0005);
      self.uimap.setRegion(MKCoordinateRegion(center: nowLocation, span: _span), animated: true);
      //加入座標
      addPointAnnotation(c.coordinate.latitude, longitude: c.coordinate.longitude);
    

    }
    //新增座標
    private func addPointAnnotation(latitude:CLLocationDegrees , longitude:CLLocationDegrees){

      //大頭針
      var point:MKPointAnnotation = MKPointAnnotation();
      //設定大頭針的座標位置
      point.coordinate = CLLocationCoordinate2D(latitude: latitude, longitude: longitude);
      point.title = "I'm here";
      point.subtitle = "緯度:\(latitude) 經度:\(longitude)";
      uimap.addAnnotation(point);
    

    }
    }

1
2
3
4
5
6
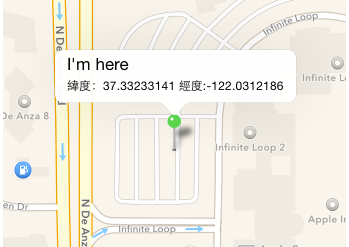
執行看看成果,點擊大頭貼可以看到剛剛設定的title與subtitle
[![](http://2.bp.blogspot.com/-sBszQR-gCvw/VPVRTFVx06I/AAAAAAAAEb8/wR8k2LQSLvI/s400/%E8%9E%A2%E5%B9%95%E5%BF%AB%E7%85%A7%2B2015-03-03%2B%E4%B8%8B%E5%8D%882.14.19.png)](http://2.bp.blogspot.com/-sBszQR-gCvw/VPVRTFVx06I/AAAAAAAAEb8/wR8k2LQSLvI/s1600/%E8%9E%A2%E5%B9%95%E5%BF%AB%E7%85%A7%2B2015-03-03%2B%E4%B8%8B%E5%8D%882.14.19.png)
* 那如果想將大頭針變色呢?
首先先將view controller繼承MKMapViewDelegate,並將mapview kit delegate指定為自己這個veiew controller ```swift
uimap.delegate = self;

  • 接著override mapview的viewForAnnotation事件 ```swift
    func mapView(mapView: MKMapView!, viewForAnnotation annotation: MKAnnotation!) -> MKAnnotationView! {
    var pointView : MKPinAnnotationView? = mapView.dequeueReusableAnnotationViewWithIdentifier(“CustomerPoint”) as?MKPinAnnotationView;
    if(pointView == nil){
    pointView = MKPinAnnotationView(annotation: annotation, reuseIdentifier: "CustomerPoint");
    //因為已經改寫了Annotation View,所以要將canShowCallout改成true,否則點擊大頭針不會跑出來我們剛剛指定的title跟subtitle
    pointView?.canShowCallout = true;
    
    }
    pointView!.pinColor = MKPinAnnotationColor.Green;
    return pointView;
    }

```

  • 結果如下
  • 這邊應該看出來整個Annotation的顯示方式都可以透過viewForAnnotation這個事件來改寫,所以下一篇就來介紹如何客製化Annotation的View